Easiest Best Optimal settings for Handbrake DVD Video Conversion – FEB19

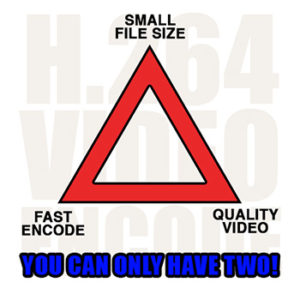
encoders-dilema-graphic

THERE IS AN UPDATED VERSION OF THIS ARTICLE FOR FEBRUARY 2022 USING HANDBRAKE VERSION 1.5.1 HERE

This is a simple easy guide on how to make the best encodes with the smallest file size in Handbrake without having to know or understand all of the settings. Just copy my settings and you’re done!

To get started right away please scroll down to the red text that says “START HERE”.

**NOTE** These settings are for DVD Video ONLY – You can find a updated Blu Ray Tutorial HERE.

MY RANT – By popular demand, I have decided to update my two articles on how to quickly and easily produce great quality DVD and Blu Ray video encodes with Handbrake. The program interface has changed, the H.264 codec has been refined, and the TV’s we view our movies on have evolved dramatically since writing the original articles.

THE GOAL – To produce the highest quality video with the smallest possible file size, whilst retaining the entire original 5.1 Dolby Digital sound track. DVD’s playing on todays large 4K TV’s look terrible due to their low resolution. We will also use Handbrakes filters to clean up the picture quality.

DISCLAIMER – This method will produce very nice quality DVD videos, but may take 2 hours or more to process each hour of video, so my advice is to let run whilst you are sleeping each night. Unfortunately, good quality video with small file size cant be done quickly, it just doesn’t work that way. Also, All set-ups are different. We all have different size TV’s, different size and shape rooms, different players and a plethora of other factors that could produce varying results. This is a guideline, and a great place for a beginner to start. If you feel there is something that could be done better, or should be done differently, please feel free to let us all know by leaving a comment.

THE TECHNICAL STUFF – My TV is a 65″ Samsung 4K which I absolutely love, and sit about 10-12 feet back from. I play the media from a Apple TV 4K, and use the Infuse Pro 5 player app. The video is encoded on a 3-4 year old HP desktop computer with a Intel I5 processor. The version of Handbrake used in this tutorial is v1.2.0 which is the current stable release for February 2019.

Ready to encode? START HERE! 

Continue reading “Easiest Best Optimal settings for Handbrake DVD Video Conversion – FEB19”

Easiest Best Optimal settings for Handbrake 1080p Blu Ray Video Conversion on Mac, Windows and Linux – UPDATED – MARCH 2023

Convert BluRay to H.264 with Handbrake

Convert BluRay to H.264 2023 Handbrake 1.6.1

Convert BluRay to the smallest file size in Handbrake without having to know or understand all of the settings. Just copy my settings and you’re done!

H.264 Vs H.265 – Which one should I use?
If you have a 4K Television and a newer media player you will want to use H.265 – See THIS ARTICLE for instructions.
If you have a 1080 HD TV and an older media player H.264 is best, so use these instructions below.

*Whilst your user interface may appear slightly different than shown here (depending on if you are using Windows, Mac or Linux), the settings and results will be the same across all platforms.

**NOTE** – These settings are for 1080P BLURAY to H.264 Video ONLY
Use these settings if you have a 1080 HD Television and older media player
To convert 1080P BLURAY to H.265 – CLICK HERE!
To convert DVD to H.265 – CLICK HERE!
To convert DVD to H.264 – CLICK HERE!
To convert 4K BLURAY to H.265 – CLICK HERE!

THE SHORT VERSION

1 Open source file in Handbrake and make sure you are on the “Summary” tab
2 Set file format to “MP4’ and deselect “Passthru Common Metadata”
3 Click “Dimensions” tab and set Resolution Limit to 1080p and leave Anamorphic as Automatic, leave cropping “Automatic” and borders “None”
4 Click the “Filters” tab
5 Leave Interlace Detection set to Default, De-interlace set to Decomb, and Preset at “Default”
6 Click the “Video” tab
7 Select “H.264 (x264)” from the Video Codec drop down
8 Select “Same As Source” in “Framerate”
9 Check the “Constant Framerate” button
10 Set “Encoder Preset” slider to “Very Slow”
11 Set “Encoder Tune” to “Film”
12 Set “Encoder Profile” to “High”
13 Set “Encoder Level” to “4.1” – If this wont play on your system drop it back to “3.1”
14 Set the “Constant Quality” slider to “24”
15 In the “Additional Options” box add ref=5:bframes=5
16 Click the “Audio” tab
17 Select the preferred 7.1 or 5.1 channel soundtrack
18 Set “Codec” to “AC3” and the Bitrate to 448kb
19 Set Mixdown to “5.1 Channels” and Samplerate to “48”
20 Click the “Subtitles” tab
21 Click the “X” in the circle at the right side to remove the subtitles track on Windows, or select “None” from dropdown on Mac
22 Click the “Chapters” tab
23 Uncheck the “Create Chapter Markers” option if you don’t want them or leave it checked if you do
24 Give your output file a unique name and save it somewhere easy to find
25 Make a preset to save the settings and Press the Green “Start Encode” button

THE LONG VERSION

Continue reading “Easiest Best Optimal settings for Handbrake 1080p Blu Ray Video Conversion on Mac, Windows and Linux – UPDATED – MARCH 2023”

Easiest Best Optimal settings for Handbrake DVD Video Conversion on Mac, Windows and Linux

Handbrake Logo

THERE IS AN UPDATED VERSION OF THIS ARTICLE FOR FEBRUARY 2022 USING HANDBRAKE VERSION 1.5.1 HERE

This is a simple easy guide on how to make the best encodes with the smallest file size in Handbrake without having to know or understand all of the settings. Just copy my settings and you’re done!

**NOTE** These settings are for DVD Video ONLY – You can find a Blu Ray Tutorial HERE.

Video encoding is a topic a lot of people are very passionate about. Factors like TV size, Viewing distance, hardware, drive space restrictions and a plethora of other concerns are all valid. But if you are like me, and just want to reduce your episodes to a more manageable size, whilst retaining most of the quality, here’s how to do it.

PLEASE NOTE This method will produce very nice quality videos, that will look good on 1080p TV’s, but may take 2 hours or more to process each hour of video, so my advice is to let it run whilst you are sleeping each night.

Once you have ripped your Disks to MKV files with Make MKV, Open Handbrake (You can download the latest version for free HERE) then press the source button and select the file you want to convert, or if you want to do a batch of files, select the folder that contains all of your ripped MKV’s. Handbrake will import them all, but you will only see the first one. Now it’s time to make some adjustments to the settings.

handbrake-dvd-settings

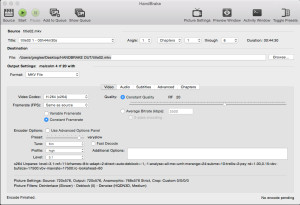
All of your settings should look like the above screen grab – Click it to enlarge.

1. Set the output format to MKV File

2. Click the button that says “Video”. Make sure the video codec is H.264 (x264)

3. The frame rate should be “Same as Source” and Constant Framerate should be selected.

4. Check Constant Quality and adjust the slider until the RF number goes to 20

5. For the encoder options, slide the preset slider to Very Slow. Trust me, it takes a while, but the quality is far superior, and usually yields a smaller file size. Unfortunately it is a trade off for speed vs quality. Like I said, run it while you are sleeping.

6. Leave “Fast Decode” unchecked.

7. Set Tune to Film

8. Set Profile to High

9. Set Level to 3.1

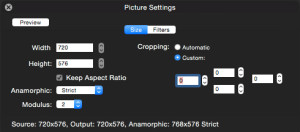
10. Now click the “Picture Settings” button in the top right side of the window.

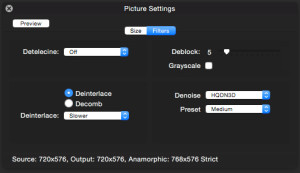
Picture Settings ButtonA new window will open. Change all of your settings look like this

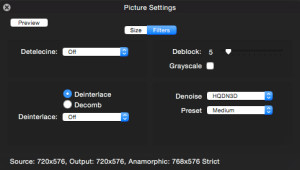
handbrake-dvd-picture-settings11. Whilst in the picture settings window, click “Filters” and change all of your settings to look like these as well. Denoise and Deblock will make the picture look SO much better when viewed on larger 1080p TVs.

handbrake-dvd-filters**If you are in the USA you can skip this step, but for the rest of us, we need to know if our video is progressive or interlaced (the method used to draw each frame of video)**

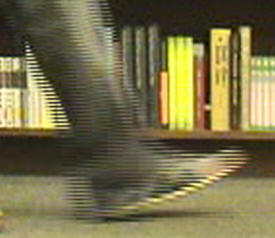
If your video is progressive, you can skip this step, but if it is interlace, you will definitely want to de-interlace the video before you watch it on a 1080 screen, otherwise you will see all kinds of ugly horizontal lines in fast moving scenes like the image below.

interlaced video(If you dont know whether your video is interlaced or progressive, Mac users can use Video Spec to find out, and Windows users can use G-Spot to find out)

If your video is interlaced, make sure “Deinterlace” is checked and select “Slower” for best results.

handbrake-dvd-deinterlace

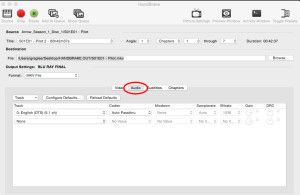
12. Now you can close out the Picture Settings window and select the “Audio” tab in the main window.

Handbrake Audio SettingsI am a real Audiofile, I love the Dolby Digital and DTS 5-7 channel audio tracks in movies, so I select “Auto PassThru”. But, if regular 2 channel Stereo is ok for you, you can configure that in this area if you want. I figure you are converting a DVD, so you might as well have the best sound quality available. Just select the Dolby Digital or DTS sound track from the drop down window, and choose “Auto Passthru”

13. Click the “Subtitles” tab and select none

14. Click the “Chapters” tab and make sure “Create Chapter Markers” is un-checked.

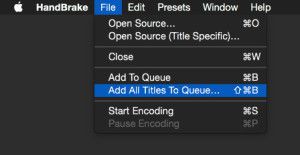
15. You are now ready to start encoding. If you are only doing one file, just press the “Start” button and Handbrake will start encoding. If you are doing a batch of files, open the File Menu and select “Add All Titles To Queue”

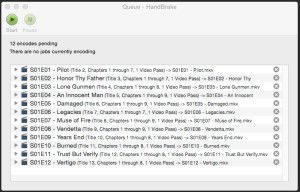
Add All Titles To Queue16. Press the “Show Queue” button to see all your files waiting to be encoded

Handbrake Queue17. Press the “Start” button and your encoding session will begin.

THERE IS AN UPDATED VERSION OF THIS ARTICLE FOR FEBRUARY 2022 USING HANDBRAKE VERSION 1.5.1 HERE

Easiest Best Optimal settings for Handbrake 1080p Blu Ray Video Conversion on Mac, Windows and Linux

Handbrake Logo

THERE IS AN UPDATED VERSION OF THIS ARTICLE FOR 2023!
CLICK HERE TO BE REDIRECTED

This is a simple easy guide on how to make the best encodes with the smallest file size in Handbrake without having to know or understand all of the settings. Just copy my settings and you’re done!

**NOTE** – These settings are for Blu Ray Video ONLY – If you want to convert DVD Video see the tutorial HERE.

My Rant – (If your not interested in my rant, scroll down to where it says “Lets Get Started”)

Circa 2000 I got really pissed off at DVD’s. You start watching them, get relaxed and into the story, and when you least expect it they skip or freeze. Sometimes they even crashed completely. In my experience, the damn things were so unwatchable that I swore I would never buy another one again. Blu Ray has been around for a while now, and it started to feel like time to try again with this new technology. I did my research, and found a player that will play all regions (Regional Encoding – one of the stupidist restrictions in the history of technology), and made a somewhat hefty investment in starting a Blu Ray collection. I purchased all of the Marvel Movies, Agents Of Shield, Alcatraz, and I had been hearing a lot about Arrow, so I purchased a Season 1 and Season 2 box set for $80 AUD. I got through Episode 1 and 2 ok, but at episode 3 the old DVD issues appeared. To cut a long story short, EVERY one of the 8 discs in the set crashes about halfway through, and the last 2 episodes on each disc will not play at all. I cant believe the movie studios get away with it. Can you imagine how many bad discs there must be around the world? Again, they drive us to action that they deem illegal.

In order to watch the show I paid $80 for – I was forced to rip the discs to my hard drive. There are plenty of tutorials out there that show you how to do this, so I am not going to cover that here. Once I had ripped the episodes, each file was almost 6GB in file size. I set about trying to reduce the sizes and found thousands of different ideas and methods. It is a topic a lot of people are very passionate about. Factors like TV size, Viewing distance, hardware, drive space restrictions and a plethora of other concerns are all valid. But if you are like me, and just want to reduce your episodes to a more manageable size, whilst retaining most of the quality, here’s how to do it.


Lets Get Started

PLEASE NOTE This method will produce very nice quality 1080p videos, but may take 2 hours or more to process each hour of video, so my advice is to let run whilst you are sleeping each night.

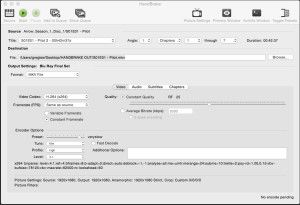
Once you have ripped your Disks to MKV files with Make MKV, Open Handbrake (You can download the latest version for free HERE) then press the source button and select the file you want to convert, or if you want to do a batch of files, select the folder that contains all of your ripped MKV’s. Handbrake will import them all, but you will only see the first one. Now it’s time to make some adjustments to the settings.

Handbrake SettingsAll of your settings should look like the above screen grab – Click it to enlarge.


THERE IS AN UPDATED VERSION OF THIS ARTICLE FOR 2023!
CLICK HERE TO BE REDIRECTED


1. Set the output format to MKV File

2. Click the button that says “Video”. Make sure the video codec is H.264 (x264)

3. The frame rate should be “Same as Source” and Constant Framerate should be selected.

4. Check Constant Quality and adjust the slider until the RF number goes to 25

5. For the encoder options, slide the preset slider to Very Slow. Trust me, it takes a while, but the quality is far superior, and usually yields a smaller file size. Unfortunately it is a trade off for speed vs quality. Like I said, run it while you are sleeping.

6. Leave “Fast Decode” unchecked.

7. Set Tune to Film

8. Set Profile to High

9. Set Level to 4.1

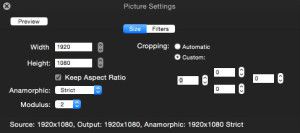
10. Now click the “Picture Settings” button in the top right side of the window.

Picture Settings ButtonA new window will open. Change all of your settings look like this

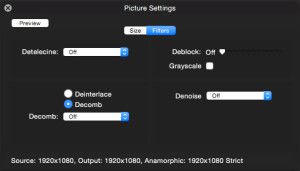
handbrake size11. Whilst in the picture settings window, click “Filters” and change all of your settings to look like these as well

handbrake filters12. Now you can close out the Picture Settings window and select the “Audio” tab in the main window.

Handbrake Audio SettingsI am a real Audiofile, I love the Dolby Digital and DTS 5-7 channel audio tracks in movies, so I select “Auto PassThru”. But, if regular 2 channel Stereo is ok for you, you can configure that in this area if you want. I figure you are converting a Blu Ray, so you might as well have the best sound quality as well. Just select the Dolby Digital or DTS sound track from the drop down window, and choose “Auto Passthru”

13. Click the “Subtitles” tab and select none

14. Click the “Chapters” tab and make sure “Create Chapter Markers” is un-checked.

15. You are now ready to start encoding. If you are only doing one file, just press the “Start” button and Handbrake will start encoding. If you are doing a batch of files, open the File Menu and select “Add All Titles To Queue”

Add All Titles To Queue16. Press the “Show Queue” button to see all your files waiting to be encoded

Handbrake Queue17. Press the “Start” button and your encoding session will begin.

Using this method I have been able to shrink each of the episodes from about 6GB in size down to about 1.3 to 1.5GB in size, retaining the full 1080p resolution and DTS sound track. The picture quality is very nice on my 42 Inch Samsung LCD TV. I play the files off my WD TV Live Hub and connect using HDMI cables. If you have a larger TV and notice some artifacts or “Blocks” in the picture, tweak the RF number slightly to 24 or at most 23. Adjustment here affects file size and quality considerably, so tread carefully and use small increments.

THERE IS AN UPDATED VERSION OF THIS ARTICLE FOR 2023!
CLICK HERE TO BE REDIRECTED


No Concerts for You!

Steve Jobs

FRIDAY:

Like him or hate him, Steve Jobs is easily one of, if not THE best CEO’s, and visionaries of the modern Tech world. Now, I know you are going to label me “Fan Boy” after reading that, and to an extent you are correct. But I confess to being a “Fan Boy” only within the boundaries of my own productivity and prosperity. My Mac Pro allows me to edit HD video, and process my photos with color calibration, in a way that Windows and Nix’s are not quiet able to do yet (If you see it differently, please comment – I would love to hear your thoughts). Please keep in mind though, as a newly labelled “Fan Boy” by you,  if one of my dogs was sick, and as I was carrying it through the car park to the vet surgery and my iPhone fell out of my pocket, I wouldn’t look back, and I wouldn’t think twice, even if a car ran over it. I am not one of “Those” people who “Would Just DIE” without their iPad, You know the type. Even though I love my Mac Pro, I do have Windows XP and Puppy Linux set up in VMWARE Fusion Virtual Machines on my Mac Pro, and I do use them both more than often, especially to view my web creations on non mac browsers like IE, Konquerer etc.

Today, Sir Stevie of Jobby-Land decreed that thou shalt not be able to film concert events with thine iPhone!

Immediately the media were on this, and it does raise some interesting questions. All of which are valid.

The way I see it, I expect the RIAA, Sony BMG, RCA etc have gotten into Sir Stevie saying that the iPhone is a piracy device. Now, to Sir Stevie’s credit, I don’t think that would bother him. He has “flipped off” the RIAA before – remember when iTunes was born? But in this case, I think Lord Jobbyness stepped up to the plate as the greatest CEO in the Galaxy, and put his company and his shareholders first, and told the RIAA and the record companies, that he would oblige, and fit their infrared anti piracy, anti music stealing, anti seal clubbing, anti granny/cop killing laser to the death star to protect the universe from the scrappy band of rebels who want to pay hundreds of dollars (or half a weeks wages) to go to a concert and record P!NK on her Trapeze thingy!

Because GOD HELP US ALL IF THAT GOT OUT!

But why?

Why would the universes greatest CEO who has proved that he is not scared of the RIAA in the past put his beloved “fruit company” in harms way, and jeopardize the companies good name to it’s customers by restricting the device and not allowing them to use it to record live performances?

I don’t believe for a second that Sir Stevie would allow this issue to make it to the global media if there wasn’t some bigger picture that we all don’t quiet see yet. Again, love him or hate him, he is just too smart, and has proved dozens of times that he is able to manipulate and control the media to his advantage.

(my prediction)

MONDAY:

Some wonderful new reason justifying why everything that’s wrong in the universe is suddenly right, and we can all smile, feeling re-assured that Apple would never hurt us, and go back to listening to U2 (soon to be renamed “I2″……..I just made that up 🙂 ) on our iPods and iPhones,  with our iMacs, taking a iDump on our iToilet…………..

He’s the “Wolf in sheep’s clothes (with a liver he purchased from a third world country)” today, but next week his “Grand Plan” will all become clear, and as a result we will all want to go and purchase new iPods/iPhones, and some Beatles music from iTunes as icing on the cake.

And just for a giggle,

Lets take a look at the App store shall we!

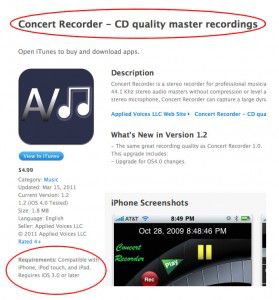
http://itunes.apple.com/us/app/concert-recorder-cd-quality/id338045354?mt=8

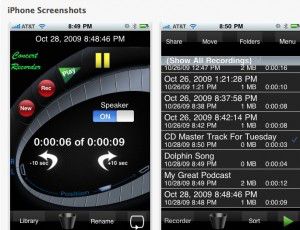
Apple Concert Recorder


Apple iPhone High Quality Concert Recorder

Download it while you can!