Native 3D Editing in Premiere Pro with Vision 3 QuickS3D Plug-In

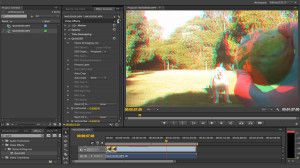
QuickS3D Plug In Sceen ShotRecently I learned about Vision 3’s QuickS3D plug-in, which provides the ability to edit 3D Multiple Streams (Stereo Pairs) and Side By Side (Multiplexed) video natively in Adobe Premiere Pro and After Effects.

After Watching several demonstration videos about the plug-in, and reading Vision 3’s site, I just had to have it. There are two different versions of the plug-in, A Lite version aimed at home users for $49, and a Pro version for $299. Most users will get the functionality they need in the Lite version.

There is no trial version of the software available, so I decided to jump in and purchase the Lite version for $49. Within minutes, I had a link to download the plug-in, as well as my activation key. I downloaded the software, and it installed easily. Upon opening Premiere Pro I was asked to supply my activation key, and upon submitting, I was presented with another window asking me for a password?
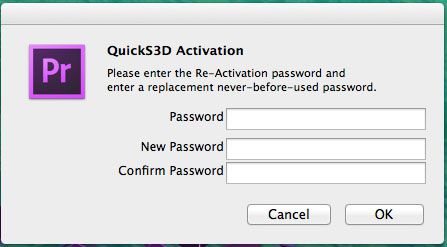
Quicks3d-activation-windowAt first I was confused as to the purpose of this secondary password request window, so I began to search through the documentation supplied with the plug-in, read the EULA, and found no reference to it. I searched the Vision 3 website, and the support forums, and again, no information was found. I did notice the forum had been spammed though.
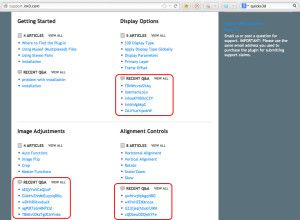
QuickS3D Forum After spending some time contemplating the situation, I entered some passwords and it activated, and Premiere Pro opened up. I imported some Side By Side 3D video and started playing with it. As claimed, the QuickS3D does indeed provide the ability to edit 3D video natively. I especially liked the way I was able to add titles to my video, apply the plug-in, and create a really nice 3D effect between the text and the background video. It felt like the text was jumping out of the screen at me.

What I didn’t like on first glance, which became incredibly annoying after applying the plug-in a few times was seeing all of the “PRO” version options greyed out. Screen real estate is at a premium in Premiere Pro anyway, but seeing so much space taken up by information which is irrelevant to me became infuriating quickly, and started to feel like a “In App Advertisement” designed to frustrate me into spending another $250 upgrading to the “PRO” version.
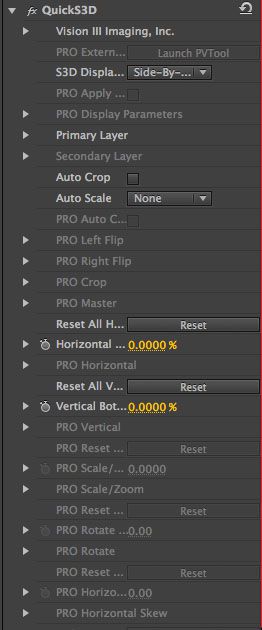
Quicks3d-optionsThe basic functionality of the plug-in felt a bit buggy to me at first, as quite a few times my video seemed to automatically revert back to Side By Side, not long after switching to Anaglyph mode. Having said that, this behavior did settle down after a while. I guess I might have been dragging across the “Display” option drop down somehow and once I got used to the plug-in a little more I stopped doing it? Maybe…But probably not…

Of the few options available in the Lite version, the basic tasks most of us will want to use are available. Features as listed from the Vision 3 Website:

Display Features

  • Top/Bottom
  • Side – by – Side
  • Frame Offset to Sync
  • Work with Stereo Pairs or Multiplexed file
  • Onion Skin (50-50)
  • Anaglyph (Red/Cyan)
  • v3 Parallax

Image Adjustments

  • Auto Crop
  • Scale to Fit
  • Scale to Fill
  • Stretch to Fit

Alignment Tools

  • Percent Only
  • Horizontal/Vertical Only

A feature I really liked is the auto crop option. This comes in very handy when adjusting the horizontal and vertical placements of the left and right channels. Using “Scale To Fit” the plug-in will scale your video so both channels fit correctly in the frame.

At this point, I was quite happy with my purchase, and decided to grab my Macbook Pro to write a review. After pondering the implications of the “Passwords” dialogue box, I came to the conclusion that the developer must have been taking a sensible approach to licensing, by allowing us the opportunity to transfer our single machine license to another machine, giving us the option to “Choose” which single machine we use our license on, as Adobe does… WRONG!

After installing the plug-in on my second machine, I tried to input my passwords from my first machine to no avail, I tried to create new passwords to no avail, and after 3 attempts, the plug-in no longer worked on EITHER machine!

Quite concerned, I re-read the documentation that came with the software, double checked the website and forum, Googled my problem, and found nothing. Under the “Support” option on Vision 3’s website I selected “Email Us”, and sent in a request for support/clarification regarding the purpose of the “Passwords” dialogue box. A few minutes later I received an automated reply with a Ticket number saying I would receive support soon…..

After a few days I still had not heard back, and sent of another request for support. 3 WEEKS LATER I have still yet to hear back from Vision 3 regarding this issue! And not surprisingly, the spam has not been cleaned/removed from the support forum.

The Bottom Line – In My Humble Opinion: Vision 3’s buggy QuickS3D Plug-In, whilst bursting with potential, is yet another piece of potentially excellent software crippled with anti-piracy measures to the point where those that have purchased it are “Guilty until deemed Innocent”. Vision 3 has no interest in supporting it’s paying customers or keeping a secure spam free support forum, they are interested only in getting your money. VERY DISAPPOINTING!

Frank Morris Cell at Alcatraz Prison with Sony Bloggie 3D

Sony-Bloggie-3D-MHS-FS3-Font-back

I recently purchased Sony’s Bloggie 3D and have been impressed with the results so far. Its small and light, has a great 3D screen, not only shoots 3D and 2D 1080P video, but 5 megapixel 2D and 2 megapixel 3D photographs as well. A few things I don’t like about this camera is the start up time is a little longer than I would like, and the battery life is poor. I often run out of battery WELL before the memory is even close to full.

But for what it does, and what you pay, this camera is a VERY cool and fun device to have in your pocket.

In July/August 2012 I visited Alcatraz Prison, and filmed Frank Morris’ Cell B-138 in 3D HD. Frank Morris was involved in the Great Escape with John and Clarence Anglin, and Allen West. Morris and The Anglin’s escaped the island never to be seen again. Personally, I think they made it to the mainland!

httpvh://youtu.be/NqALt8edlSI

Convert 2D video to Anaglyph 3D using Adobe Premiere Pro

2d to 3d
This Post Is Beginner Friendly

httpvh://youtu.be/1xWwLmQEilM

I have been looking at sites and blogs lately that describe how to make a 3D Anaglyph (viewed using Red/Blue Glasses) picture from a 2D picture using the channel mixer in Adobe Photoshop, and I was wondering if this method could also be implemented in Adobe Premier Pro? After a little bit of testing, and finding a few video’s on Youtube about it, I decided to give it a try.

For this experiment, my donor file will be a AWESOME video I found on Youtube by z400hauls featuring Brandon Bernsteins 8000hp Nitro Methane Dragster warming up.

z400hauls brandon berstein video

This video is shot in 720p Hi Def, with great audio, and it does a great job conveying what it is like to be so close to one of these fire breathing monsters. Please check out z400hauls other videos too!

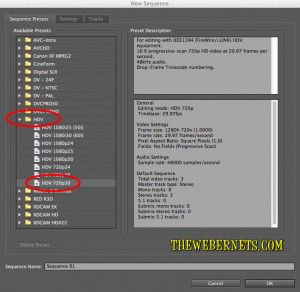
To begin, open Premiere Pro (If you don’t have it, you can download a fully functioning 30 day free trial from Adobe.com) and create a new project. As z400hauls source video is 720P at 30fps (Frames Per Second), I am going to stick with this for my 3D transformation settings.

premiere-pro-sequence-settingsOnce you have created the appropriate editing environment for your videos specs, import your source/donor video by selecting the file menu, dragging down to “Import” and selecting your file.

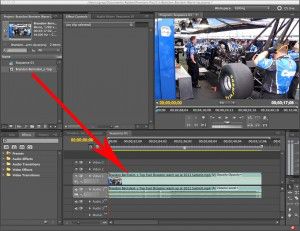
Once you have it in Premiere Pro, Drag it to the timeline.

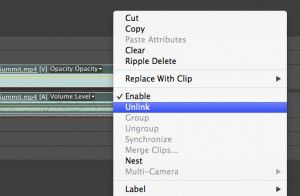
premiere-pro-editing-windowThe next step is to create a second video track from the first, so we can make the left and right channels required to trick our brains into seeing 3D. To copy the video track only (because we don’t need two identical audio tracks) click the video in the timeline to highlight it (Notice the audio track will highlight as well), then right click it and select “Unlink”. This will unlink the video and audio tracks.

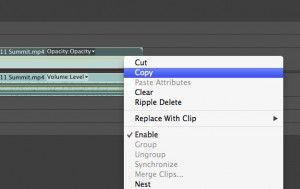
unlink-video-premiere-proNow you can click on the video track to highlight it only, and the audio track will stay unselected. When your video track only is highlighted, right click it and select “Copy”.

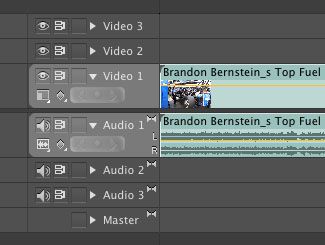
copy-video-track-premiere-proThe next step is a little tricky, so follow carefully. Premiere Pro is a bit like Photoshop, in that it uses Layers to build up the scene. If you were to select “Paste” from the edit window now, it will place the copied video on the same track as the original one, which doesn’t help us. We need to place the copied video onto a separate layer, or track, in order to achieve a stereoscopic effect. If you look closely, you will see that video track 1, and audio track 1 are highlighted, and are a different color from the other spare blank tracks that Premier Pro set up for us when we created the document.

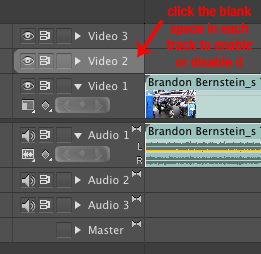
highlighted-tracksThis means that these tracks are active and are the ones we are working on. As we want to put video onto video track 2, click the blank area in the video track 1 and audio track 1 attributes bar to deselect them, and then click the blank are next to where it says “Video 2” to Activate/Highlight this track.

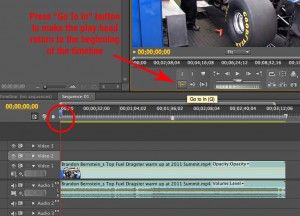
activate-track-2Now that we have Video Track 2 selected, we are nearly ready to paste in the second video channel. Premiere Pro will place the video wherever the play head (red vertical line) is, so to make sure our two video tracks line up, press the “Go To In” button to make sure the play head is at the very beginning of the timeline.

go-to-in-point-buttonNow that the play head is at the beginning of the timeline, and Video Track 2 is selected, click edit from the menu bar, and select “Paste”. Now you have two video tracks! WOOHOO!!!

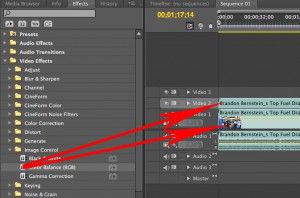
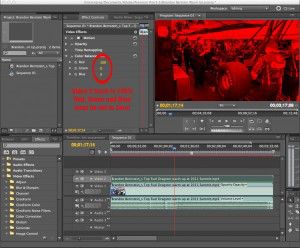
two video tracksNow comes the fun part! Our next task is to separate the color channels, and create the “Parallax” effect. This is what tricks our brains into thinking that what we are seeing is 3 Dimensional. As we are creating a Red/Blue Anaglyph 3D effect, we need to separate the red and blue colors in our 2 video tracks. At this point, we will define “Video 2” track as our left/red channel, and “Video 1” track as our right/blue channel. To separate our colors, we will be using the “Color Balance RGB” effect. Open “Video Effects” then “Image Control” and drag and drop the “Color Balance” effect icon onto Video 1 track, and then again onto Video 2 track.

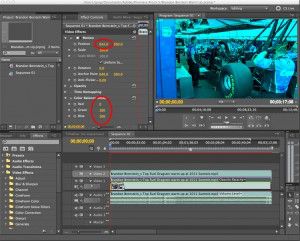
drag-color-balanceFirst, lets do the left/red channel. Click the video in the “Video 2” track to highlight it, and in the “Effect Controls” window set the green and blue channels to Zero. This will leave only red.

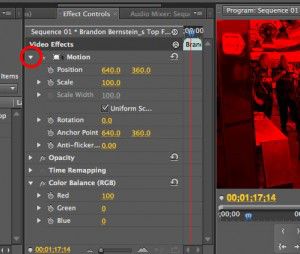
separate-red-channelTo create the “Parallax Effect”, whilst in “Effect Control”, click the little triangle next to “Motion” to expand this option so we can tinker with its settings.

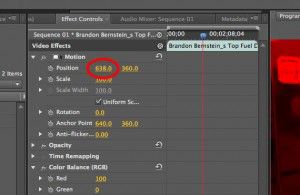
motion-expandedAs this videos dimensions are 1280px x 720px, you can see next to “Position” that the center point of the video is at 640px on the horizontal plane, and 360px vertical. To create the Parallax, we need to offset the left channel to the left of the screen slightly. To do this, simply adjust “640” to “638”. This will move our left channel 2 Pixels to the left of the screen.

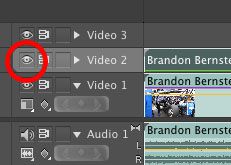
Move Position to Create ParallaxWe are now finished with the left channel for the moment, so lets make it invisible, so we can get to work on the right channel. To make it invisible, simply click the “Eyeball” icon in the attributes field as shown below.

Toggle Track VisibilityYour video preview window should loose the red tinge, and be restored to normal. Next, Highlight the Video 1 track (Right/Blue) in the timeline, and set the red to zero in Color Balance, leaving blue and green at 100. Then, enhance the Parallax by moving the Right/Blue channel 2 Pixels to the right. Again, click the triangle next to “Motion” to expand and reveal the options, and set the horizontal plane to 642. If you have done everything right, your video preview will now look all Blue-Ish.

Right-channel-settingsIt is now time to bring the left and right channels together and create the Anaglyph. Go back to the Video 2 (red/left) track’s attributes area and make it visible again by clicking the eyeball icon. Your video preview will turn red again. If you click the eyeball repeatedly a few times you will see that not only does your video turn from red to blue, but it also moves position – Yes! That’s the Parallax Effect – You have made a 2D video 3D!

YAY YOU!!!!!

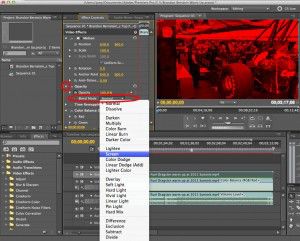
To finish up, we need to blend them together. This is where Premiere Pro borrows from Photoshop. Blending is what makes Photoshop so powerful. With your Left/Red channel visible (Eyeball Icon clicked so the video preview window has the red tinge), click the little triangle next to “Opacity” in the “Effect Control” panel. Click the drop down menu next to “Blend Mode” and select “Screen”.

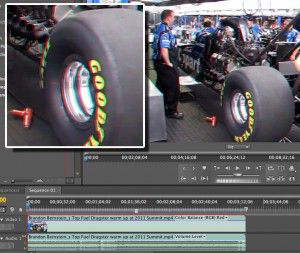
set-blending-screenVOILA! ANAGLYPH VIDEO!

anaglyph-effect

Using these settings, the 3D effect is only mild. To really make a strong 3d Parallax Effect, you move the left and right frames further apart. Instead of 638 for the Red/Left channel, and 642 for the Blue/Right channel, try 636 for the left and 644 for the right, or 630 for the left and 650 for the right. Experiment with these numbers until it looks right for you.

But BE CAREFUL – Don’t push these numbers to far, because you can make the video really blurry.

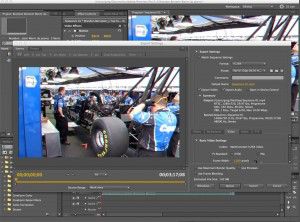
To save and export the video, select file, export, media from the menu bar. I will be exporting it in exactly the same format as I imported it, but you can play with these settings if you want to export your video in a different format, or for another device.

export-mediaOnce you have exported your new Anaglyph 3D video file, All you need to do now is put on your Red/Blue 3D glasses, turn your volume up to 11, and enjoy this AWESOME video from z400hauls in 3D!

If you, or your friends pass out, or barf, try reducing the Parallax Effect by moving your Red/Left and Blue/Right fields closer together 🙂

Cloud Computing – Good idea, or does it really suck?

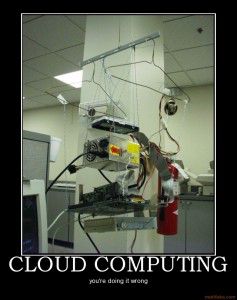
Cloud Computing PictureI saw this picture today, and not only did I think it was pretty funny, I thought about how much I think “The Cloud” is a dumb idea. Its considerably slower when using apps (Have you tried Photoshop Express Online? What about Premiere Express Online?), and if you are storing files “In The Cloud”, what happens if the servers crash, or the company disappears before you can get them back (Happened to me and thousands of others when Bubbleshare and Video Egg went away). You might say, “Well you have to keep a local backup copy!” – Doesn’t that defeat the purpose of “The Cloud”?

I am not a fan! It reminds me of how it used to be cool to back up your sites and databases on your server within your site. That was a dumb idea too!