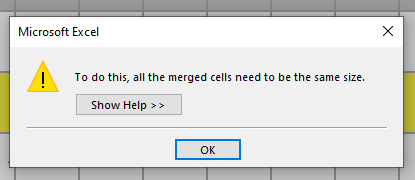
Has Microsoft Office Excel ever confronted you with the error dialogue box that says “To do this, all the merged cells need to be the same size” when you are trying to sort your columns and data? It was driving me crazy, but a little dig into the documents settings revealed the culprit. To solve it just click the little triangle in the top left hand corner of your spreadsheet once to select the whole document.
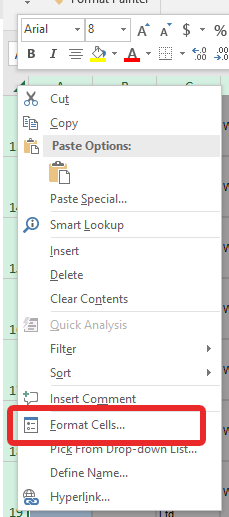
Then right click on it to reveal some options and select “Format Cells”
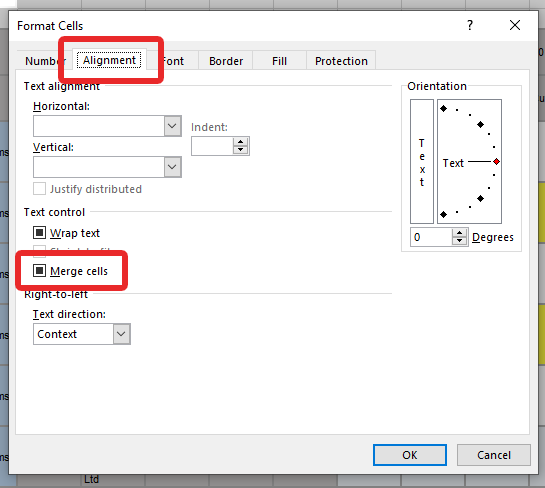
This will open another menu with six tabs. Select the “Alignment” tab. Once selected, find the “Merge Cells” option.
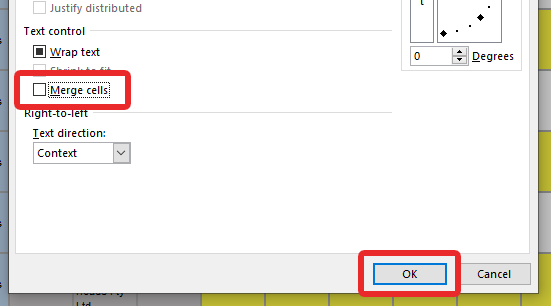
Once you have found it, click it a few times until the box is empty.
Once the check box is empty, click “OK” and you are back in the game!
If you are reading this, there is a good chance it is because your 2011 Macbook Pro bit the dust big time, just like mine did. I paid over $3000 for it, and whilst it is 6 years old now I have grown incredibly fond of it, and I really wanted to revive it.
The problem stems from the Graphics Card. There are actually two graphics processors in these machines, the Discrete Card which is an ATI Radeon (This is the one that fails) and an Integrated one, which is an Intel Chip integrated into the motherboard. The reason Apple included two graphics processors is that the ATI Radeon is super fast, which is great for the gaming experience and video, and when you are working on spreadsheets or sending emails, the integrated Intel processor uses way less power and considerably increases battery life. The truth of the matter is, if you aren’t a gamer, the Integrated Intel Graphics Processor is just fine, and thankfully this chip is what allows you to get your machine up and running again.
**THIS HAS WORKED FOR ME – I HOPE IT WORKS FOR YOU, BUT I CANT GUARANTEE IT**
This is not a guaranteed permanent fix – But it has been working for me, and hopefully you experience similar results.
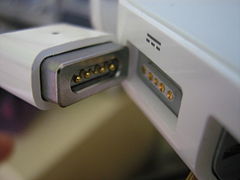
My machine kept crashing not long after it would boot, which made it impossible to work on, until I found out that if you don’t have it plugged in to the power, it should boot using the integrated graphics. When its plugged in the power hungry faulty card is used, so disconnect from power.
Disconnect The Power
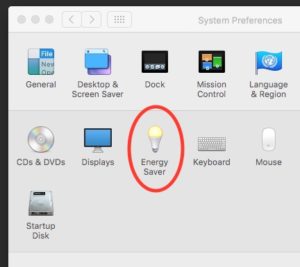
Once you get it booted go into system preferences and look for “Energy Options”
Long story short, as I am a beta tester for Micro$oft I previously installed a preview version of Windows 10. My life circumstances have changed since, so I haven’t been keeping up with its development, nor have I been updating the brand new HP PC I bought for it.
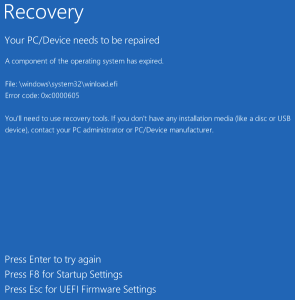
So today (Some time after the trial version has expired) I turned on the machine……BRICK…….nothing.
Couldn’t boot from disk, couldn’t boot from a USB drive, NOTHING but:
“a component of the operating system has expired”
The bottom line, if you want to reclaim your files and reinstall or upgrade, just boot into BIOS and set the date to JUNE 2015.
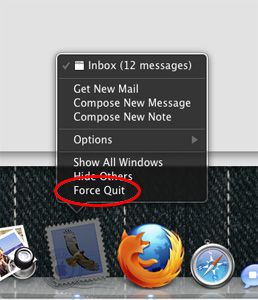
Last week a problem appeared with my Macbook Pro. Each time I wanted to shut it down I would get a dialogue box error pop up telling me that Mail had cancelled the shut down. It became very frustrating. Each time I wanted to shut off the computer I had to “Force Quit” mail.
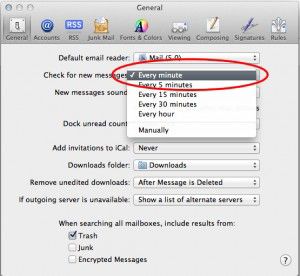
Determined not to be beaten, I delved into mac mail preferences to see if I could spot an error. After some time I spotted my problem. Recently I was waiting on an important email, and I set mail to check for mail every minute. It occurred to me that mail was probably checking for new mail and working online when I was trying to close it, therefore it was cancelling shutdown.
Once I set “Check for new messages” to every 5 minutes, the problem went away.
**UPDATE** – Since writing this article I have also learned that if you have RSS feeds setup up in Mac Mail (Versions before Mountain Lion) closing the app and system shut down will also fail if the feeds are being updated!
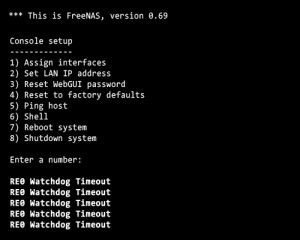
Like most FreeNAS errors, this one just appeared out of nowhere, on a system that has been untouched, and running trouble free for some months. Once the error showed up on the screen, I was unable to connect to my shares, or the Web GUI to trouble shoot it. The term “RE0” was a giveaway, because I remember when I assigned the NIC it was given this label. My first thought was that the NIC card died, and I replaced it with an identical card I have here which I know is good. This didn’t change anything unfortunately.
After a short search through my files and found a backup of the FreeNAS configuration XML file I had made recently (A habit I have gotten into with this system). With this in hand, I selected option 4, and reset the system to Factory Defaults. After rebooting and re-assigning the interfaces, to my surprise everything came back up. After logging in through the Web GUI and being able to access things again, I tried to restore the settings from the configuration.xml file. This failed badly. The system would not boot from the hard drive now, and even though all the data is backed up, I still got that sinking feeling in my stomach.
After inserting the Freenas Disc in the drive and setting the boot order in bios, I was able to boot the system from the Live CD. Knowing I had my raid configuration in the XML file, I re-installed the FreeNAS operating System onto the hard drive, re-assigned the interfaces, and was again back to factory defaults. I again logged in through the Web GUI and backed up the clean install XML file, and then opened it in text editor. I also opened my original backup file from when things were good, and compared the two. I did find the problem.
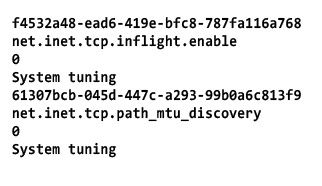
When I compared the two files together I noticed dozens of additional lines in the backup XML file, that weren’t in the fresh one. They looked like these:
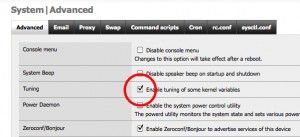
Then it struck me that what must have happened, is that FreeNAS was tweaking itself, and I guess it must have made a mistake somewhere along the way. I unchecked the box in the Advanced settings panel, removed all of the extra lines of code that contained “System tuning” from the backup XML file, and restored it into FreeNAS, and VOILA! It was all back online, my Raid 5 was in tact, and everything was back to normal.
I have been using it for a bout 5 days now since implementing the fix, and it is back to its old self again. It hasn’t skipped a beat!
11 Aug 2011 – I have just been playing around again with my Freenas and found I can trigger this error immediately by filling in the MTU option. Leaving this field blank works fine, but the second I try to set it for something like Jumbo MTU (9000) it goes into error mode the second I try to remotely access a share.
We use cookies on our website to give you the most relevant experience by remembering your preferences and repeat visits. By clicking “Accept”, you consent to the use of ALL the cookies.
This website uses cookies to improve your experience while you navigate through the website. Out of these, the cookies that are categorized as necessary are stored on your browser as they are essential for the working of basic functionalities of the website. We also use third-party cookies that help us analyze and understand how you use this website. These cookies will be stored in your browser only with your consent. You also have the option to opt-out of these cookies. But opting out of some of these cookies may affect your browsing experience.
Necessary cookies are absolutely essential for the website to function properly. This category only includes cookies that ensures basic functionalities and security features of the website. These cookies do not store any personal information.
Any cookies that may not be particularly necessary for the website to function and is used specifically to collect user personal data via analytics, ads, other embedded contents are termed as non-necessary cookies. It is mandatory to procure user consent prior to running these cookies on your website.