Best Optimal Handbrake Settings to convert 4K BLURAY to H.265 HEVC on Mac Windows Linux – JULY 2023

Convert 4K BLURAY to H.265 HEVC with HandbrakeConvert 4K BLURAY

Convert 4K BLURAY to H.265 HEVC with Handbrake without having to know or understand all of the settings. Just copy my settings and you’re done!

*Whilst your user interface may appear slightly different than shown here (depending on if you are using Windows, Mac or Linux), the settings and results will be the same across all platforms.

**NOTE** – These settings are for 4K BLURAY to H.265 HEVC Video

To convert 1080P BLURAY to H.265 – CLICK HERE!
To convert 1080P BLURAY to H.264 – CLICK HERE!
To convert DVD to H.265 – CLICK HERE!
To convert DVD to H.264 – CLICK HERE!

THE SHORT VERSION

1 Open source file in Handbrake and make sure you are on the “Summary” tab
2 Set file format to “MKV”
3 Click “Dimensions” tab and set Resolution Limit to “2160P 4K Ultra HD” and leave Anamorphic as Automatic, leave cropping “Automatic” and borders “None”
4 Click the “Filters” tab
5 Leave Interlace Detection set to Default, De-interlace set to Decomb, and Preset at “Default”. If your system CANNOT play HDR video set colourspace to BT.709 (If you are not sure create a small test video as shown HERE).
6 Click the “Video” tab
7 Select “H.265 10-Bit (x265)” from the Video Codec drop down
8 Select “Same As Source” in “Framerate”
9 Check the “Constant Framerate” button
10 Set “Encoder Preset” slider to “Slow”
11 Set “Encoder Tune” to “None”
12 Set “Encoder Profile” to “Main 10”
13 Set “Encoder Level” to “5.1”
14 Set the “Constant Quality” slider to “24”
15 In the “Additional Options” box add strong-intra-smoothing=0:rect=0:aq-mode=1:rd=4:psy-rd=0.75:psy-rdoq=4.0:rdoq-level=1:rskip=2
16 Click the “Audio” tab
17 Select the preferred 7.1 or 5.1 channel soundtrack. Select “Passthru” to keep, or go to next step to compress
18 Set “Codec” to “AC3” and the Bitrate to 448kb
19 Set Mixdown to “5.1 Channels” and Samplerate to “48”
20 Click the “Subtitles” tab
21 To remove all subtitles on MAC set the dropdown to “None”, and on Windows click the greyed out “X” on the right hand side. To keep subtitles, select the desired subtitles track from the dropdown, and unselect “Forced Only” and “Burn In” to allow you to turn them off and on as desired. To keep a second subtitle track click “Track” and then “Add New Track”. Repeat the process for the second track. To burn a track into the picture so the subtitle are always there check “Burn In”.
22 Click the “Chapters” tab
23 Uncheck the “Create Chapter Markers” option if you don’t want them or leave it checked if you do
24 Give your output file a unique name and save it somewhere easy to find
25 Make a preset to save the settings and Press the Green “Start Encode” button

THE LONG VERSION

Continue reading “Best Optimal Handbrake Settings to convert 4K BLURAY to H.265 HEVC on Mac Windows Linux – JULY 2023”

Bluray Subtitles Demystified – What settings to use in Handbrake on Windows

Bluray Subtitles Demystified –  What settings to use in Handbrake

bluray subtitles

Bluray Subtitles behave differently to what we are used to in DVD’s. DVD subtitles are basically a text file with timings noted, and the specific text is displayed at the correct time. Bluray’s however use graphics that are pretty similar to PNG files. Each line of text is actually a little picture overlayed on top of the movie. Therefore, including subtitles in your Bluray encodes with Handbrake seems a bit tricky! However, in reality it’s actually easier than you think, let me show you how!

Once you have “Make” a MKV file from your source disk, there are two ways to go. We can either use the PGS subtitles from the disk in Handbrake directly, or we can convert the PGS subtitles to SRT text based subtitles. You are probably thinking “But won’t Handbrake burn the PGS subtitles in” and “I want to be able to turn them on and off”. And there is a very simple solution:

Continue reading “Bluray Subtitles Demystified – What settings to use in Handbrake on Windows”

Best Optimal Handbrake Settings to convert 1080 BluRay to H.265 HEVC on Mac Windows Linux MARCH 2023

Convert BLURAY to H.265 HEVC with Handbrake

Convert BLURAY to H.265 HEVC with Handbrake without having to know or understand all of the settings. Just copy my settings and you’re done!

H.264 Vs H.265 – Which one should I use?
If you have a 1080 HD TV and an older media player you will want to use H.264 – See THIS ARTICLE for instructions.
If you have a 4K Television and a newer media player H.265 is best, so use these instructions below.

*Whilst your user interface may appear slightly different than shown here (depending on if you are using Windows, Mac or Linux), the settings and results will be the same across all platforms.

**NOTE** – These settings are for 1080P BLURAY to H.265 HEVC Video
Use these settings if you have a recent 4K UHD Television and newer media player like the Apple TV 
4K.
To convert 1080P BLURAY to H.264 – CLICK HERE!
To convert DVD to H.265 – CLICK HERE!
To convert DVD to H.264 – CLICK HERE!
To convert 4K BLURAY to H.265 – CLICK HERE!

THE SHORT VERSION

1 Open source file in Handbrake and make sure you are on the “Summary” tab
2 Set file format to “MKV’ and deselect “Passthru Common Metadata”
3 Click “Dimensions” tab and set Resolution Limit to 1080p and leave Anamorphic as Automatic, leave cropping “Automatic” and borders “None”
4 Click the “Filters” tab
5 Leave Interlace Detection set to Default, De-interlace set to Decomb, and Preset at “Default”
6 Click the “Video” tab
7 Select “H.265 10-Bit (x265)” from the Video Codec drop down
8 Select “Same As Source” in “Framerate”
9 Check the “Constant Framerate” button
10 Set “Encoder Preset” slider to “Slow”
11 Set “Encoder Tune” to “None”
12 Set “Encoder Profile” to “Main 10”
13 Set “Encoder Level” to “5.1” – If this wont play on your system drop it back to “4.1”
14 Set the “Constant Quality” slider to “24”
15 In the “Additional Options” box add strong-intra-smoothing=0:rect=0:aq-mode=1:rd=4:psy-rd=0.75:psy-rdoq=4.0:rdoq-level=1:rskip=2
16 Click the “Audio” tab
17 Select the preferred 7.1 or 5.1 channel soundtrack
18 Set “Codec” to “AC3” and the Bitrate to 448kb
19 Set Mixdown to “5.1 Channels” and Samplerate to “48”
20 Click the “Subtitles” tab
21 Click the “X” in the circle at the right side to remove the subtitles track on Windows, or select “None” from dropdown on Mac
22 Click the “Chapters” tab
23 Uncheck the “Create Chapter Markers” option if you don’t want them or leave it checked if you do
24 Give your output file a unique name and save it somewhere easy to fid
25 Make a preset to save the settings and Press the Green “Start Encode” button

THE LONG VERSION

Continue reading “Best Optimal Handbrake Settings to convert 1080 BluRay to H.265 HEVC on Mac Windows Linux MARCH 2023”

Best Optimal Settings for Handbrake convert DVD to H265 HEVC Mac Windows Linux 2023

Convert DVD to H265 with HandbrakeConvert DVD to H265

Convert DVD to H265 HEVC with Handbrake without having to know or understand all of the settings. Just copy my settings and you’re done!

H.264 Vs H.265 – Which one should I use?
If you have a 1080 HD TV and an older media player you will want to use H.264 – See THIS ARTICLE for instructions.
If you have a 4K Television and a newer media player H.265 is best, so use these instructions below.

*Whilst your user interface may appear slightly different than shown here (depending on if you are using Windows, Mac or Linux), the settings and results will be the same across all platforms.

**NOTE** – These settings are for DVD to H265 HEVC Video
Use these settings if you have a recent 4K UHD Television and newer media player like the Apple TV 
4K.
To convert DVD to H.264 – CLICK HERE!
To convert 1080P BLURAY to H.264 – CLICK HERE!
To convert 1080P BLURAY to H.265 – CLICK HERE!
To convert 4K BLURAY to H.265 – CLICK HERE!

INSTRUCTIONAL VIDEO COMING SOON!

THE SHORT VERSION

IMPORTANTBefore you begin, drop your source DVD file into Mediainfo and identify if the video stream is 480 or 576 size! (Different countries use different sizes)

1 Open source file in Handbrake and make sure you are on the “Summary” tab
2 Set file format to “MKV’ and deselect “Passthru Common Metadata”
3 Click “Dimensions” tab and set Resolution Limit to 480p or 576p (depending on your source file) and leave Anamorphic as Automatic, leave cropping “Automatic” and borders “None”
4 Click the “Filters” tab
5 Leave Interlace Detection set to Default, De-interlace set to Decomb, and Preset at “Default”
6 Click the “Video” tab
7 Select “H.265 10-Bit (x265)” from the Video Codec drop down
8 Select “Same As Source” in “Framerate”
9 Check the “Constant Framerate” button
10 Set “Encoder Preset” slider to “Slow”
11 Set “Encoder Tune” to “None”
12 Set “Encoder Profile” to “Main 10”
13 Set “Encoder Level” to “4.1”
14 Set the “Constant Quality” slider to “22”
15 In the “Additional Options” box ad strong-intra-smoothing=0:rect=0:aq-mode=1:rd=4:psy-rd=0.75:psy-rdoq=4.0:rdoq-level=1:rskip=2
16 Click the “Audio” tab
17 Select the preferred 5.1 channel soundtrack – If it is AC-3/Dolby Digital 5.1 click pass thru and go to step 20
18 Set “Codec” to “AC3” and the Bitrate to 448kb
19 Set Mixdown to “5.1 Channels” and Samplerate to “48”
20 Click the “Subtitles” tab
21 Click the “X” in the circle at the right side to remove the subtitles track on Windows, or select “None” from dropdown on Mac
22 Click the “Chapters” tab
23 Uncheck the “Create Chapter Markers” option if you don’t want them, or leave it checked if you do
24 Give your output file a unique name and save it somewhere easy to find
25 Make a preset to save the settings and Press the Green “Start Encode” button

THE LONG VERSION

Continue reading “Best Optimal Settings for Handbrake convert DVD to H265 HEVC Mac Windows Linux 2023”

Quick and Easy Convert DTS 5.1 or AAC 5.1 to Dolby Digital AC3 on Mac with MKV Tools

MKV Tools can convert AAC and DTS to Dolby Digital!
MKV Tools Logo

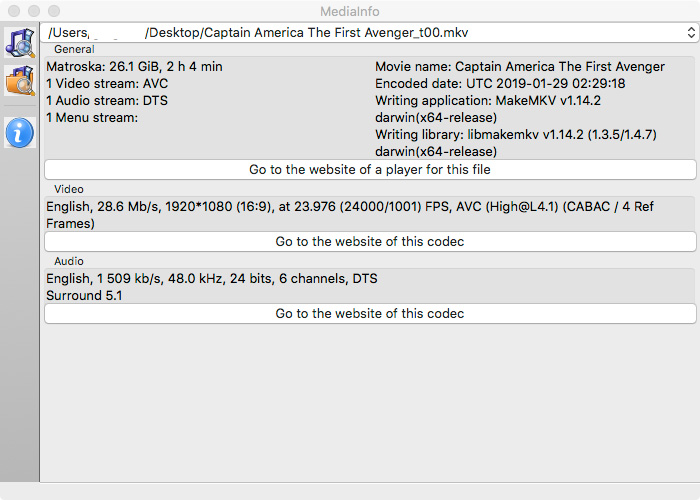
A lot of new TV’s these days do not support the DTS Soundtrack found in BluRay and DVD discs. I learned this the hard way when I got my new 65 Inch Samsung 4K TV. A lot of older audio equipment can not play AAC 5.1 either. I have ripped a lot of my Blu Rays to a network drive and it seems a large number of them have DTS. Usually, us Mac users are left out, but in this case we have an awesome tool available to us to fix this easily called MKV Tools. It works very quickly as it allows the video to “Pass Through” without having to be re-encoded. Only the audio is touched. As you can see in the below screen capture of my source file in Media Info below, the video file I am starting with has a DTS sound track.

DTS Video File

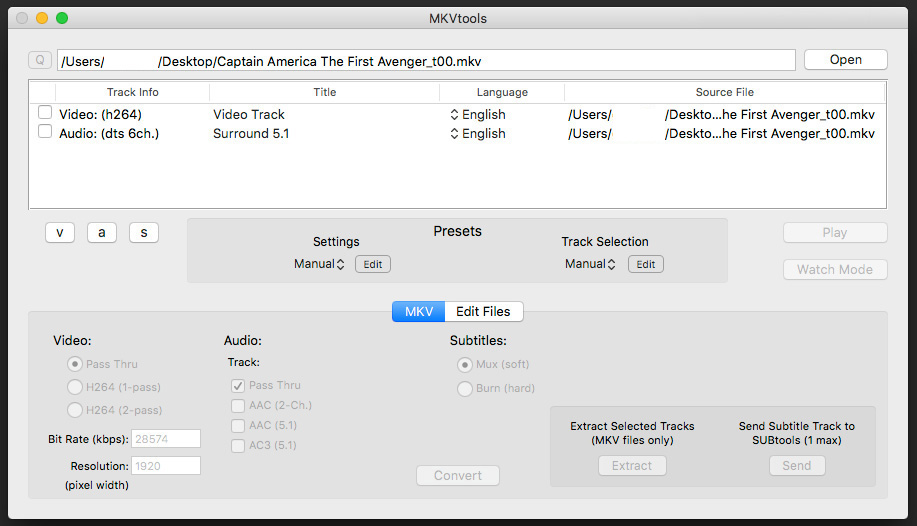
To convert it to a more compatible AC3 format download and install MKV Tools HERE. Once you have opened MKV Tools you will need to choose “Open” to import your video file, as drag’n’drop is not supported in the unregistered version. At this point you will receive another “Nag” window. Just wait a few seconds and you will be able to select “Register Later”, then you can choose your video file. Once the file is imported you will see the main window.


MKV-Tools-Window-1

At this point you need to select the video and audio streams you need to work on, then you can start making adjustments.

MKV-Tools-Window-2

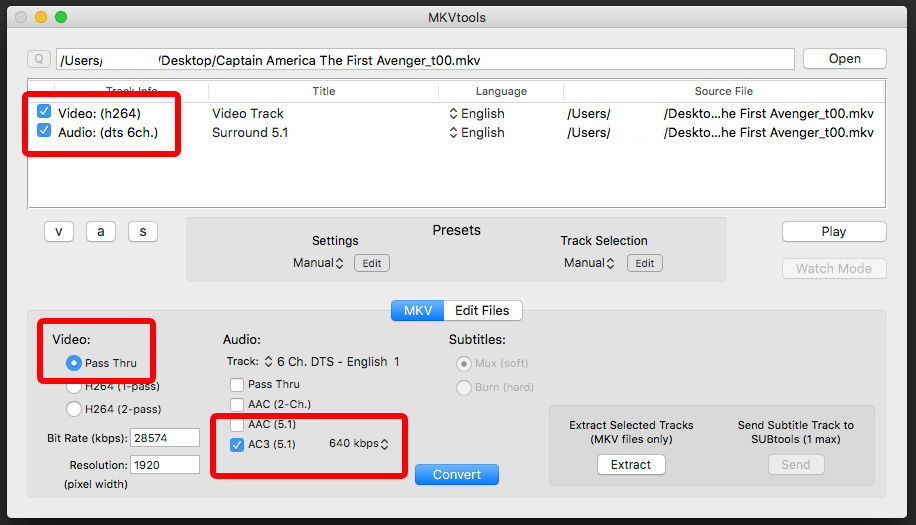
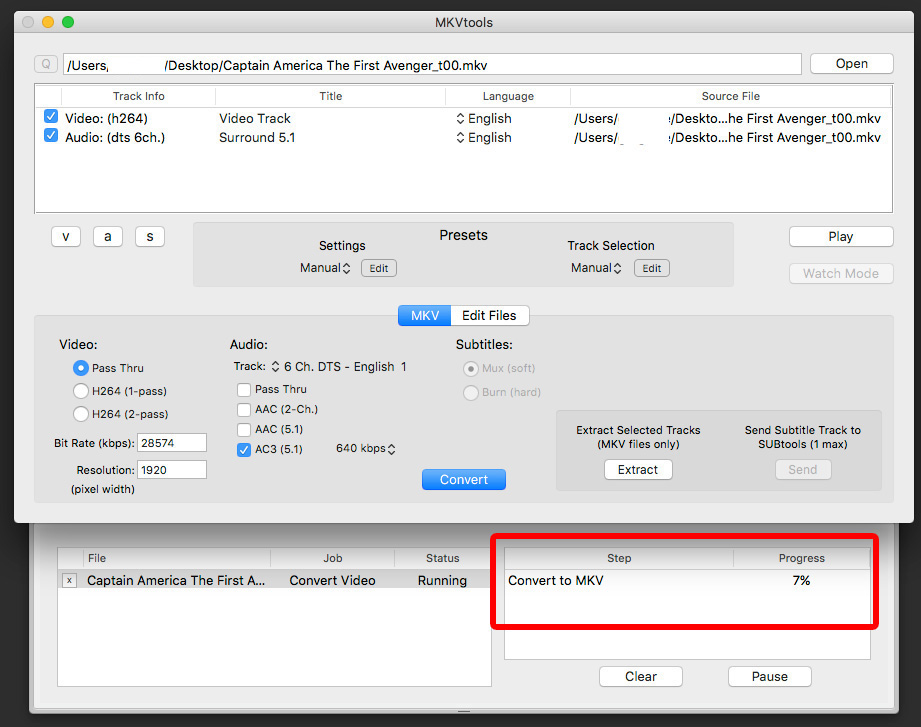
Once you have selected the Audio and Video channels, make sure video is set to “Pass Thru”. In the audio options, select AC3 (5.1) and deselect “Pass Thru”. Then set your desired bit rate. I prefer 640kb, but you can go down to 384kb comfortably without any real noticeable quality loss. Then, press the “Convert” but and MKV Tools will start converting your audio stream. A new tab will fold out underneath the main window where you can view the progress.

MKV-Tools-Window-3


Whilst MKV Tools is not technically free, it is a bargain at $5.99. You can use it without paying to re-encode as many videos as you like, but given how powerful and convenient it is, and how little it costs, its well worth buying/registering in my opinion. I did!

Quickly and Easily Download, Convert and Burn Media with Wondershare Video Converter Ultimate

Wondershare-Video-Converter-Ultimate-Logo

Smartphones, iPads, Laptops, Desktops, iTV’s, Game boxes, it’s amazing how many different ways we can watch video/tv these days. I, like many other people get most of the stuff I watch from the internet, and for the past few years have had to jump through a series of hoops to download my content, convert it to suitable formats, and load it onto my devices. Recently I was made aware of a piece of software that simplifies, and streamlines the whole process, called Wondershare Video Converter Ultimate.

Available for Windows and Mac, Wondershare Video Converter Ultimate has some really nice features to make your life a lot easier. Not only can you drop videos you already have into it and re-encode them into a format suitable for any of your devices in 2x clicks (1 to pick your device, another to start the conversion), the software can even download new content for you from a number of sites, and format that for you as well!

wondershare-video-converter-ulimate-main-window

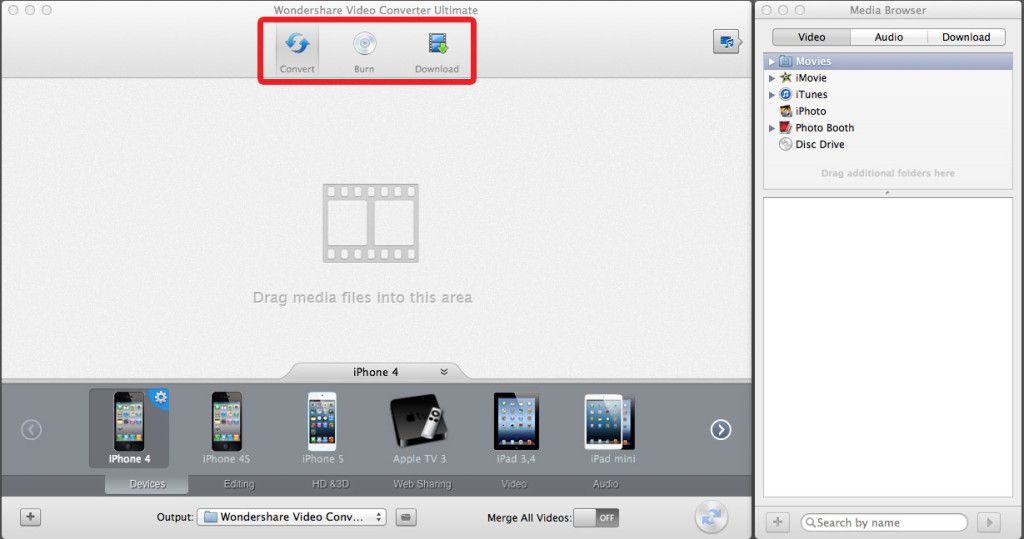
To get started, there are three buttons at the top of the main window. The CONVERT button allows you to convert your video to different formats for different devices (which you can select by clicking the appropriate picture at the bottom of the screen), and you can even make your own custom profiles. The BURN button takes you to a screen where you can simply drop your video files in, and press burn, and the program will author and burn a DVD for you. The DOWNLOAD button allows you to navigate to media you want to keep, and it will download that media for you, and save it to your local media library, where you can use it later in either the Convert or Burn areas of the program.

A friend of mine has a music video on Youtube that I really like, and I wan’t to put it on my iPhone so I can watch it, but I also want to be able to listen to it as well. I can do that easily with Wondershare Video Converter Ultimate.

Clicking the Download button takes you to a Web Browser inside the program, and there are some bookmarks already set out for you to help you get started. In this case, I am going to navigate to Youtube.

download-bookmarks

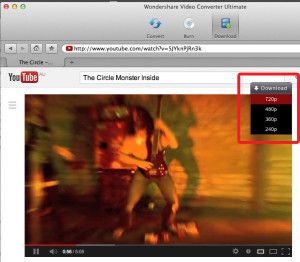
Once you have found the file you want to download, click the download button at the top right of the window, and select which definition version you want.

Download-ButtonThe video will now start downloading in the media browser.

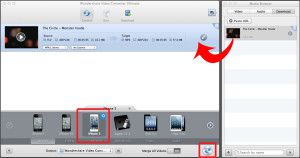
Download-ButtonOnce the video has completed downloading, you can then switch to Convert Mode, and drag the downloaded video into the convert area. Select your conversion profile from the categories below (In my case, iPhone 5), and then click the convert button.

download-to-converter

Once converting begins, you will see a progress bar. You can also tell the program to automatically add the newly converted file to iTunes when its done!

video-progress

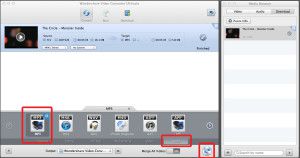
That’s how easy it is to add a video, and now lets extract the audio out of the video to a MP3, so we can listen to it, and put it in a playlist with our other favorite music. All you have to do to make the same file into a MP3, is click AUDIO at the bottom of the profiles area, click the MP3 icon, and click the Convert button again, and Wondershare Video Converter Ultimate will now make the video into a music file.

video-audio

You can then load it onto your MP3 player!

Wondershare says:

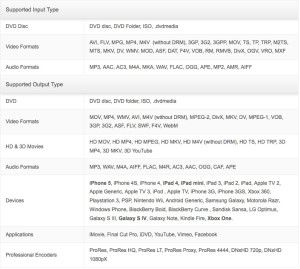
“anyone can easily convert video to 158 formats, including MOV, M4V, MP4, WMV, MKV, AVI, XviD,MPEG, DVD-Video, FLV, 3GP and load more–perfect to fit your iPad, iPhone(iPhone 5 included), iPod(iPod Touch 5 included), android,windows Phone,PSP, Xbox 360 and a rainbow of other devices.”

Below is a list of all supported formats.

Wondershare-supported-formats

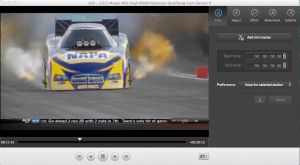
Some other cool features I really like is that you can also crop your videos so they fit your screen better, you can trim out unwanted stuff from your videos (like commercials), you can merge multiple videos into one file, perform color corrections, De-Interlace, and a swag of other really cool tweaks.

wondershare-editing-windowYou can download your free trial of Wondershare Video Converter Ultimate for Mac or Windows HERE.

You can also purchase a license key from Wondershare for $59.95 – A small price to pay for such a great piece of software!