Split large audio files into individual tracks with Audacity This tutorial shows you how easy it is to split large audio files into single individual tracks using the free program called Audacity on Mac, Windows and Linux
You can download Audacity FREE for Mac, Windows and Linux/Unix HERE.
This is a simple easy guide on how to make the best encodes with the smallest file size in Handbrake without having to know or understand all of the settings. Just copy my settings and you’re done!
**NOTE** – These settings are for DVD Video ONLY – You can find a Blu Ray Tutorial HERE.
Video encoding is a topic a lot of people are very passionate about. Factors like TV size, Viewing distance, hardware, drive space restrictions and a plethora of other concerns are all valid. But if you are like me, and just want to reduce your episodes to a more manageable size, whilst retaining most of the quality, here’s how to do it.
PLEASE NOTE – This method will produce very nice quality videos, that will look good on 1080p TV’s, but may take 2 hours or more to process each hour of video, so my advice is to let it run whilst you are sleeping each night.
Once you have ripped your Disks to MKV files with Make MKV, Open Handbrake (You can download the latest version for free HERE) then press the source button and select the file you want to convert, or if you want to do a batch of files, select the folder that contains all of your ripped MKV’s. Handbrake will import them all, but you will only see the first one. Now it’s time to make some adjustments to the settings.
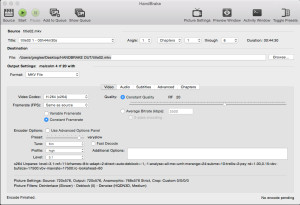
All of your settings should look like the above screen grab – Click it to enlarge.
1. Set the output format to MKV File
2. Click the button that says “Video”. Make sure the video codec is H.264 (x264)
3. The frame rate should be “Same as Source” and Constant Framerate should be selected.
4. Check Constant Quality and adjust the slider until the RF number goes to 20
5. For the encoder options, slide the preset slider to Very Slow. Trust me, it takes a while, but the quality is far superior, and usually yields a smaller file size. Unfortunately it is a trade off for speed vs quality. Like I said, run it while you are sleeping.
6. Leave “Fast Decode” unchecked.
7. Set Tune to Film
8. Set Profile to High
9. Set Level to 3.1
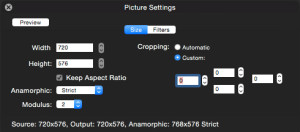
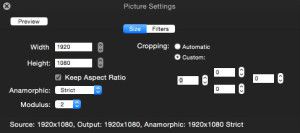
10. Now click the “Picture Settings” button in the top right side of the window.
A new window will open. Change all of your settings look like this
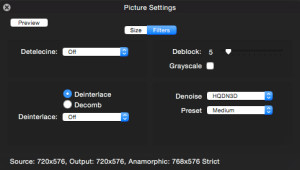
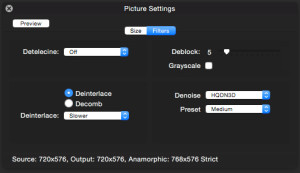
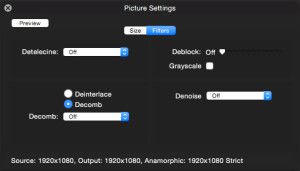
11. Whilst in the picture settings window, click “Filters” and change all of your settings to look like these as well. Denoise and Deblock will make the picture look SO much better when viewed on larger 1080p TVs.
**If you are in the USA you can skip this step, but for the rest of us, we need to know if our video is progressive or interlaced (the method used to draw each frame of video)**
If your video is progressive, you can skip this step, but if it is interlace, you will definitely want to de-interlace the video before you watch it on a 1080 screen, otherwise you will see all kinds of ugly horizontal lines in fast moving scenes like the image below.
(If you dont know whether your video is interlaced or progressive, Mac users can use Video Spec to find out, and Windows users can use G-Spot to find out)
If your video is interlaced, make sure “Deinterlace” is checked and select “Slower” for best results.
12. Now you can close out the Picture Settings window and select the “Audio” tab in the main window.
I am a real Audiofile, I love the Dolby Digital and DTS 5-7 channel audio tracks in movies, so I select “Auto PassThru”. But, if regular 2 channel Stereo is ok for you, you can configure that in this area if you want. I figure you are converting a DVD, so you might as well have the best sound quality available. Just select the Dolby Digital or DTS sound track from the drop down window, and choose “Auto Passthru”
13. Click the “Subtitles” tab and select none
14. Click the “Chapters” tab and make sure “Create Chapter Markers” is un-checked.
15. You are now ready to start encoding. If you are only doing one file, just press the “Start” button and Handbrake will start encoding. If you are doing a batch of files, open the File Menu and select “Add All Titles To Queue”
16. Press the “Show Queue” button to see all your files waiting to be encoded
17. Press the “Start” button and your encoding session will begin.
This is a simple easy guide on how to make the best encodes with the smallest file size in Handbrake without having to know or understand all of the settings. Just copy my settings and you’re done!
**NOTE** – These settings are for Blu Ray Video ONLY – If you want to convert DVD Video see the tutorial HERE.
My Rant – (If your not interested in my rant, scroll down to where it says “Lets Get Started”)
Circa 2000 I got really pissed off at DVD’s. You start watching them, get relaxed and into the story, and when you least expect it they skip or freeze. Sometimes they even crashed completely. In my experience, the damn things were so unwatchable that I swore I would never buy another one again. Blu Ray has been around for a while now, and it started to feel like time to try again with this new technology. I did my research, and found a player that will play all regions (Regional Encoding – one of the stupidist restrictions in the history of technology), and made a somewhat hefty investment in starting a Blu Ray collection. I purchased all of the Marvel Movies, Agents Of Shield, Alcatraz, and I had been hearing a lot about Arrow, so I purchased a Season 1 and Season 2 box set for $80 AUD. I got through Episode 1 and 2 ok, but at episode 3 the old DVD issues appeared. To cut a long story short, EVERY one of the 8 discs in the set crashes about halfway through, and the last 2 episodes on each disc will not play at all. I cant believe the movie studios get away with it. Can you imagine how many bad discs there must be around the world? Again, they drive us to action that they deem illegal.
In order to watch the show I paid $80 for – I was forced to rip the discs to my hard drive. There are plenty of tutorials out there that show you how to do this, so I am not going to cover that here. Once I had ripped the episodes, each file was almost 6GB in file size. I set about trying to reduce the sizes and found thousands of different ideas and methods. It is a topic a lot of people are very passionate about. Factors like TV size, Viewing distance, hardware, drive space restrictions and a plethora of other concerns are all valid. But if you are like me, and just want to reduce your episodes to a more manageable size, whilst retaining most of the quality, here’s how to do it.
Lets Get Started
PLEASE NOTE – This method will produce very nice quality 1080p videos, but may take 2 hours or more to process each hour of video, so my advice is to let run whilst you are sleeping each night.
Once you have ripped your Disks to MKV files with Make MKV, Open Handbrake (You can download the latest version for free HERE) then press the source button and select the file you want to convert, or if you want to do a batch of files, select the folder that contains all of your ripped MKV’s. Handbrake will import them all, but you will only see the first one. Now it’s time to make some adjustments to the settings.
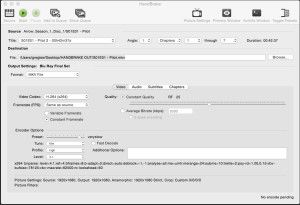
All of your settings should look like the above screen grab – Click it to enlarge.
2. Click the button that says “Video”. Make sure the video codec is H.264 (x264)
3. The frame rate should be “Same as Source” and Constant Framerate should be selected.
4. Check Constant Quality and adjust the slider until the RF number goes to 25
5. For the encoder options, slide the preset slider to Very Slow. Trust me, it takes a while, but the quality is far superior, and usually yields a smaller file size. Unfortunately it is a trade off for speed vs quality. Like I said, run it while you are sleeping.
6. Leave “Fast Decode” unchecked.
7. Set Tune to Film
8. Set Profile to High
9. Set Level to 4.1
10. Now click the “Picture Settings” button in the top right side of the window.
A new window will open. Change all of your settings look like this
11. Whilst in the picture settings window, click “Filters” and change all of your settings to look like these as well
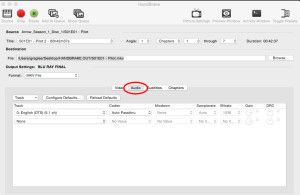
12. Now you can close out the Picture Settings window and select the “Audio” tab in the main window.
I am a real Audiofile, I love the Dolby Digital and DTS 5-7 channel audio tracks in movies, so I select “Auto PassThru”. But, if regular 2 channel Stereo is ok for you, you can configure that in this area if you want. I figure you are converting a Blu Ray, so you might as well have the best sound quality as well. Just select the Dolby Digital or DTS sound track from the drop down window, and choose “Auto Passthru”
13. Click the “Subtitles” tab and select none
14. Click the “Chapters” tab and make sure “Create Chapter Markers” is un-checked.
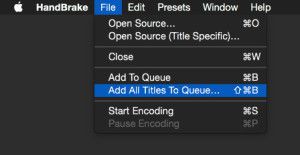
15. You are now ready to start encoding. If you are only doing one file, just press the “Start” button and Handbrake will start encoding. If you are doing a batch of files, open the File Menu and select “Add All Titles To Queue”
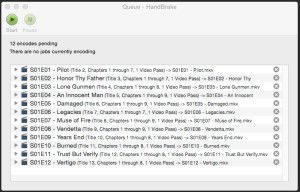
16. Press the “Show Queue” button to see all your files waiting to be encoded
17. Press the “Start” button and your encoding session will begin.
Using this method I have been able to shrink each of the episodes from about 6GB in size down to about 1.3 to 1.5GB in size, retaining the full 1080p resolution and DTS sound track. The picture quality is very nice on my 42 Inch Samsung LCD TV. I play the files off my WD TV Live Hub and connect using HDMI cables. If you have a larger TV and notice some artifacts or “Blocks” in the picture, tweak the RF number slightly to 24 or at most 23. Adjustment here affects file size and quality considerably, so tread carefully and use small increments.
The quickest and easiest way I have found to keep my video library under control is by using an automatic file naming tool called Filebot. You can view the website HERE.
From the creators website:
FileBot makes organizing your movies and TV shows a breeze! We’ll automatically match your files with information from various online databases. How you want your media files to be named and organized is completely up to you. Our groovy format engine supports pretty much anything!
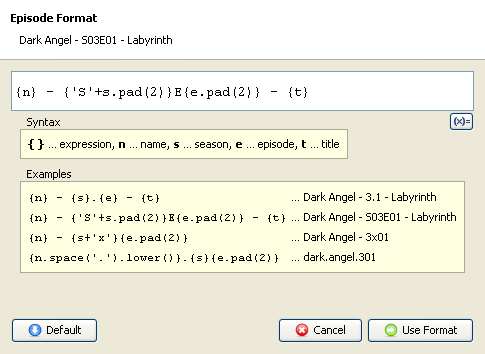
What I like best about it is being able to customize the output in anyway you please. I arrange my files in folders, so I have no need for the show title to be in the filename, I just like the season and episode number, as well as the episode title. But you can make your filenames include pretty much anything you want by adjusting the output formula.
Heres My Filebot Formula {s00e00} - {t.replacePart(' Part $1').replaceAll("&", replacement = "And").replaceAll("'", replacement = "").replaceAll("!", replacement = "").replaceAll(",", replacement = "")}
Also from the Filebot website, here are some sample naming options:
{n} [{y}] {vf}{af}The Man from Earth [2007] 720p 6ch
Filebot is free to download and use from their website HERE. MAC USERS – If you try to download Filebot through the app store it is not free – It costs $4.99US, but you can get the latest version for free from Filebots Sourceforge file repository HERE. Just open the folder for the latest version and download the app.tar.gz version of the file.
There are plenty of articles on the internet that provide you with many ways you can attempt to reclaim data from a dead or dying hard drive. Everything from putting the platters in a new drive casing to bagging the drive up and placing it in the freezer for 20 minutes. These all seem to be fairly extreme measures to me, so here’s a quick tip I have discovered recently by accident which may help.
I have a number of old drives I have been using as storage, and I recently needed to access a file on one, and when I plugged the drive into my USB dock it spun up but would not mount. I re-tried several times and it refused to load. Needless to say I was pretty unhappy. I kept coming back to it over the next few days, trying again and again, hoping it would mount so I could “just get that one file”. A few weeks later, whilst having a clean up, I decided to give it one more try and if it didn’t work, I was going to throw it away.
I plugged the drive in, it spun up, and again it refused to mount. At this point I was called away quiet urgently, and I left with the drive plugged in and turn on. After about 4-5 hrs I returned, and found the drive had some heat in it. Wondering if this might yield a result I switched off the drive, then switched it on again, and it mounted, and I was able to get the file!
I seized the opportunity to copy off all the other data on the drive, and then I started to wonder…
I had two other drives that I had deemed dead in the past, so I plugged those in and left them to warm for a few hours. After restarting them, both of them mounted as well. One mounted and appeared to work well, but the other mounted just long enough for me to drag a few files off, and then it ejected itself again. In the week or so since, I have been able to reconnect and use two of the three drives normally.
I’m wondering if tarnish might have built up on the read/write head over the period when it was not in use, and a little bit of heat might have been all it took to break it down enough for it to be able to read again? Either way, if your drive spins up but wont initialize, this method might be well worth trying before you take extreme action.
Smartphones, iPads, Laptops, Desktops, iTV’s, Game boxes, it’s amazing how many different ways we can watch video/tv these days. I, like many other people get most of the stuff I watch from the internet, and for the past few years have had to jump through a series of hoops to download my content, convert it to suitable formats, and load it onto my devices. Recently I was made aware of a piece of software that simplifies, and streamlines the whole process, called Wondershare Video Converter Ultimate.
Available for Windows and Mac, Wondershare Video Converter Ultimate has some really nice features to make your life a lot easier. Not only can you drop videos you already have into it and re-encode them into a format suitable for any of your devices in 2x clicks (1 to pick your device, another to start the conversion), the software can even download new content for you from a number of sites, and format that for you as well!
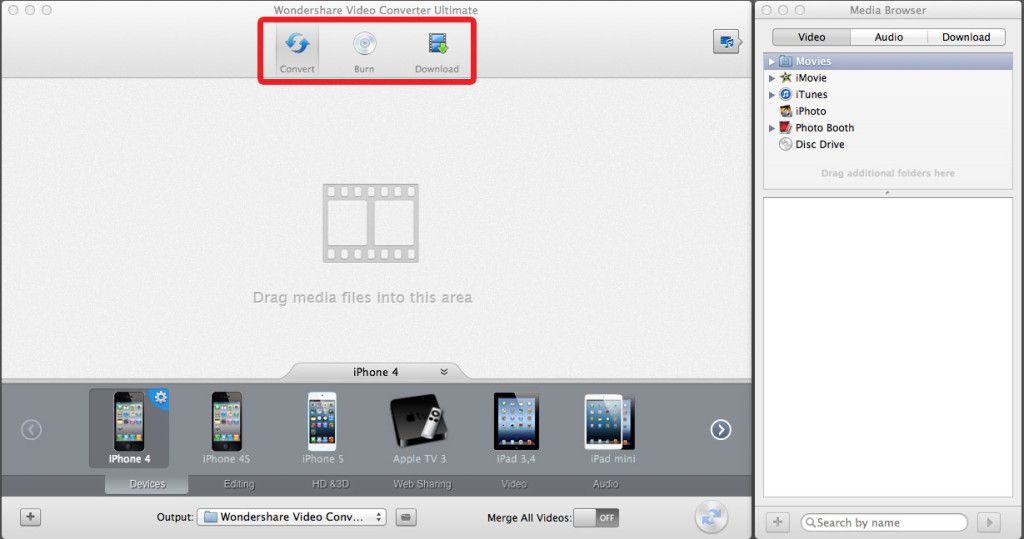
To get started, there are three buttons at the top of the main window. The CONVERT button allows you to convert your video to different formats for different devices (which you can select by clicking the appropriate picture at the bottom of the screen), and you can even make your own custom profiles. The BURN button takes you to a screen where you can simply drop your video files in, and press burn, and the program will author and burn a DVD for you. The DOWNLOAD button allows you to navigate to media you want to keep, and it will download that media for you, and save it to your local media library, where you can use it later in either the Convert or Burn areas of the program.
A friend of mine has a music video on Youtube that I really like, and I wan’t to put it on my iPhone so I can watch it, but I also want to be able to listen to it as well. I can do that easily with Wondershare Video Converter Ultimate.
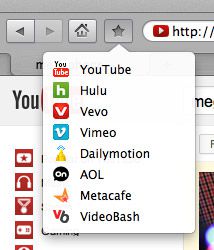
Clicking the Download button takes you to a Web Browser inside the program, and there are some bookmarks already set out for you to help you get started. In this case, I am going to navigate to Youtube.
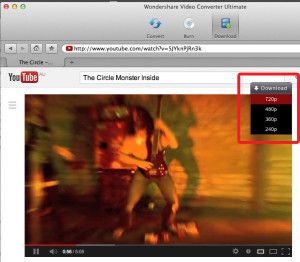
Once you have found the file you want to download, click the download button at the top right of the window, and select which definition version you want.
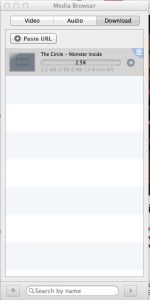
The video will now start downloading in the media browser.
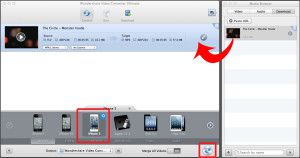
Once the video has completed downloading, you can then switch to Convert Mode, and drag the downloaded video into the convert area. Select your conversion profile from the categories below (In my case, iPhone 5), and then click the convert button.
Once converting begins, you will see a progress bar. You can also tell the program to automatically add the newly converted file to iTunes when its done!
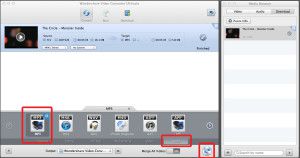
That’s how easy it is to add a video, and now lets extract the audio out of the video to a MP3, so we can listen to it, and put it in a playlist with our other favorite music. All you have to do to make the same file into a MP3, is click AUDIO at the bottom of the profiles area, click the MP3 icon, and click the Convert button again, and Wondershare Video Converter Ultimate will now make the video into a music file.
You can then load it onto your MP3 player!
Wondershare says:
“anyone can easily convert video to 158 formats, including MOV, M4V, MP4, WMV, MKV, AVI, XviD,MPEG, DVD-Video, FLV, 3GP and load more–perfect to fit your iPad, iPhone(iPhone 5 included), iPod(iPod Touch 5 included), android,windows Phone,PSP, Xbox 360 and a rainbow of other devices.”
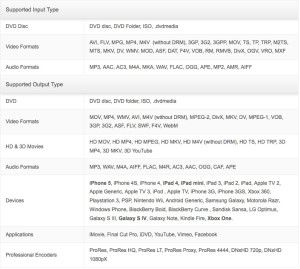
Below is a list of all supported formats.
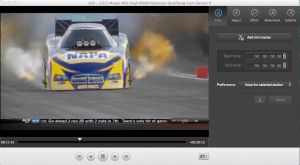
Some other cool features I really like is that you can also crop your videos so they fit your screen better, you can trim out unwanted stuff from your videos (like commercials), you can merge multiple videos into one file, perform color corrections, De-Interlace, and a swag of other really cool tweaks.
You can download your free trial of Wondershare Video Converter Ultimate for Mac or Windows HERE.
You can also purchase a license key from Wondershare for $59.95 – A small price to pay for such a great piece of software!
We use cookies on our website to give you the most relevant experience by remembering your preferences and repeat visits. By clicking “Accept”, you consent to the use of ALL the cookies.
This website uses cookies to improve your experience while you navigate through the website. Out of these, the cookies that are categorized as necessary are stored on your browser as they are essential for the working of basic functionalities of the website. We also use third-party cookies that help us analyze and understand how you use this website. These cookies will be stored in your browser only with your consent. You also have the option to opt-out of these cookies. But opting out of some of these cookies may affect your browsing experience.
Necessary cookies are absolutely essential for the website to function properly. This category only includes cookies that ensures basic functionalities and security features of the website. These cookies do not store any personal information.
Any cookies that may not be particularly necessary for the website to function and is used specifically to collect user personal data via analytics, ads, other embedded contents are termed as non-necessary cookies. It is mandatory to procure user consent prior to running these cookies on your website.