I know that dialogue warning boxes are there for a reason, and they protect us from accidentally deleting stuff we don’t really want to delete, but I work with dozens of files, and dozens of versions of files at a time. If you are someone who has the need to delete files a lot, and likes to see the “Empty” trash can icon (like me) it is possible to disable that annoying “Are you sure you really want to empty your trash can, even though you just specifically right clicked on the icon and purposely selected the “empty trash” option?” dialogue box.
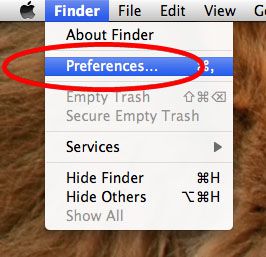
Click on your desktop to activate the finder, then under the “Finder” menu, select preferances.
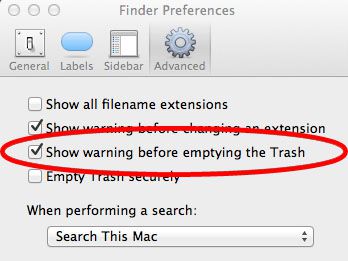
Once you have selected “Preferences” and the preferences pane is open, its just a simple matter un-checking the “Show warning before emptying the Trash” option.
Its only a little thing I know, but if you are a true “Power-User”, this is a godsend that can save you a lot of extra clicks.
Over time I have sent a lot of email from my iPhone, and it seems like iOS4/5 remembers every one of them fondly. As soon as I start typing an address it offers me a list of all of those email addresses that I sent one email to 3 years ago, instead of the one I want, and use regularly. In this post I am going to show you how I cleared that list on my phone.
As you would expect, you need to download a third party app and hack into the bowls of your phone to do this. And if you do decide to do this, you do so at your own risk ok!
I found a program called iBackUpBot, which lets you modify a number of aspects of your iOS4/5 device. Its not a free program, but there is enough functionality in the trial version so you can clear your recent emails list though. There is a Windows and a Mac version, so the procedure will work on both systems. Download and install.
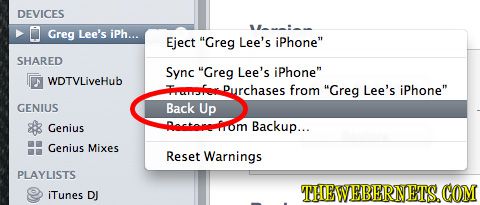
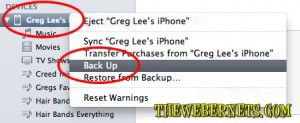
Once you have downloaded, plug your phone in, and open iTunes. The first thing you need to do is make a back up, because its the back up files you will be working on. To force a back up, Right click on your device in the iTunes side bar and select “Back Up” from the context menu.
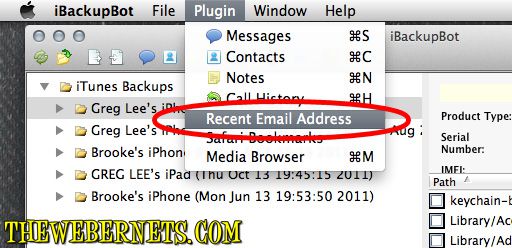
Once the back up is complete, you can close out of iTunes, but leave your phone connected. Now open up iBackUpBot. You will need to select the back up file you just created (by device name, date and time) and click it. It will then start analyzing your back up file. Once it has finished analyzing you will see a whole bunch of entries appear on the right. Dont worry about these, as we wont be using them for this procedure. The next step is to select “Plug In” from the menu, and then select “Recent Email Addresses”.
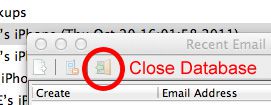
You will be confronted with a window that prompts you to purchase the program, you can click the cancel button to make it go away. Once it disappears, a window called “Recent Email Address Viewer” will pop up and you will see the list of recent email addresses stored in your phones memory. You can now go through the list and delete the ones you don’t want to see any more, and keep the ones you do. Just click on the offending address then hit your delete key. Once your finished, click the “Close Database” icon to save your changes and close out the window.
Now it’s time to reload your modified file back to your phone. Click the “Restore Backup To iPhone” button to begin. You will have to click OK/Accept in a dialogue box, and it will take a little while, so be patient.
Once everything is finished, you can close iBackUpBot, disconnect your phone and try it out!
Over the years since I began Dogs With Blogs, I have received a lot of emails from people with all kinds of weird and wonderful new ideas. I recently heard from Furcode.com about their High Tech Pet ID Tags, and this is one idea I really want to get behind. I think its a great product!
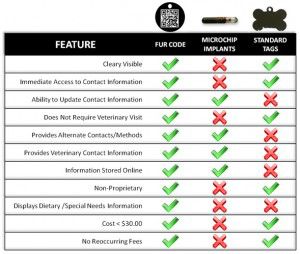
Now, I really cant take anything away from Micro Chipping, because it is always with the dogs. Even if the dog slips its collar off, they can still be identified. I do now however see Micro Chipping as a secondary or “Back Up” means of identification. For INSTANT pet identification (with no need to take the animal to a vet or shelter to have the chip read) you cant beat FurCode.com High Tech Pet ID Tags.
My initial thought on the QR Code was that it might not mean anything to a “non-techie” person, but it is definitely a technology that is going to grow and become more main stream, no doubt. What I really like about these tags is the unique web address that comes with every tag. Once you receive the tag, you log in to your web page, and you can type in ALL your dogs details. Now, if your doggy busts out, whoever finds them can look at their web page, and contact you IMMEDIATELY.
Now, you might be thinking “doesn’t an ordinary dog tag do that?”, and the answer is yes, but that’s all it does. What if your doggy is hurt, and needs vet attention, but is allergic to specific medication? By logging on to the dogs web page, the person who finds it knows instantly not only who owns the dog, but who it’s vet is, allergies, dietary needs, medications, conditions, vaccinations, and a swag of other important information that can keep your doggy safe and alive.
What if your phone breaks? Or you are out of town? If your pooch is wearing a Furcode Tag when he/she escapes, you can ALSO be contactable via your Mobile/Cell, alternate phone numbers, email, Facebook and Twitter! Imagine trying to jam all of that onto a regular tag!
The best part about this, its just SO easy to update. No forms, fees, trips to the vet, just log in to your online account and make the changes – simple!
If you have an iPhone, I can’t recommend “Scan” QR Code Reader highly enough. Its free, simple, and just works! You can check it out on iTunes HERE or on QR Code City’s web site HERE.
My iPhone/iTunes has been bugging me for a while now about how my phone is running out of memory, and it won’t let me load more music, or take new photographs or video. My first instinct was that I should clean house, and move some photos or songs off it, and whilst it was plugged in to my Mac I noticed something interesting in the storage capacity stats window:
1.03 GB of Other? I would much rather have an extra GB of music and photos than a GB of “Other”! So, I did a little bit of research and it looks to me that “other” is stuff like contacts, calendars and emails etc, so no joy to be had there, but it is also log files, history, cache, and other gunk that is meaningless to most users. There were also reports in the Apple forums that you can reclaim “some” of that space with a full system restore. So I thought I would give it a try!
I started by making a full backup of my phone. Once my iPhone was plugged in to my computer, and it showed up in iTunes, I right clicked on it and selected “Backup” from the menu. It took a few minutes to copy everything over.
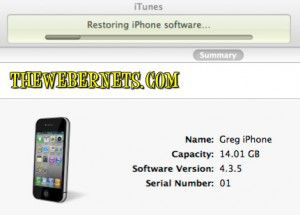
Once that was all done, I went to the “Summary” window and clicked the “Restore” button.
After clicking the usual procession of Ok’s, Yes Please’s, and I Understand’s, it set about completely wiping my iPhone.
Once it had erased the memory, it began uploading the 4.3.5 software installation, powered on and off a few times, and then I got asked if I wanted to restore my phone from the back up I created, or if I wanted to start my phone from fresh again. I clicked “Restore from Back Up” so it would reinstall my apps, contacts, music etc etc and off it went again It did take some time to completely erase, and re-install the software and my files and info (about 15-20 minutes), but it was well worth it!
My iPhone went from 1.03GB of “Other” down to 0.24GB of “Other”! That’s nearly 800KB of “Other” that can now be used for photos and music!
Isn’t it nice when something just works! I have recently moved house, and in my previous home I had a very elaborate security system which included infra red video cameras with motion detection (so I know when the Feds/Aliens are trying to sneak up on me to steal my brain waves). In actual fact, the cams were simply so my wife and I could check in on our doggies whilst we were out, night or day. I set up a web server for my cam feeds, and we can see the dogs on our iPhones (pretty cool, and VERY easy to do – will post article soon). The problems is though, I haven’t had a chance to recreate this monster system in our new house, but we still want to be able to see the pups.
I managed to find the XP based computer (the heart of the security system) in amongst all of the moving madness, and plugged in a few cams to get something going. A real bonus in our old house was that the walls were just filled with Ethernet cable going in every direction, it was quiet a work of art actually. Sadly, Not so much in the new place. So to get connected quickly I plugged in a Netcomm NP900n wireless dongle I have, and the machine was connected quickly and easily. I reconfigured my web server with the my new I.P and other info regarding my new internet connection, and with an average amount of fuss (to be expected when dealing with all matters tech) we were able to spy on our doggies from anywhere in the world again. Feeling very pleased with myself, and my superior knowledge of port forwarding and other gunk most people don’t even know exists, I ran disk clean up, defragged, and went through my regular “Window Cleaning” routine. Now, I have the computer set to “Auto Reboot on Power Failure” in bios, and my video cam server program shortcut is in “Start Up Items”, so if there is a power failure, the machine restarts and my servers run up the moment the power is restored. After my maintenance routine completed, I chose to “restart” the computer, as you do. Here is where the fun starts.
When this machine was using a wired connection, the Gigabit network connection was up immediately on start up, the internet connection was available to the web server when it was launched, so it began serving up the CCTV feed with no problems. I have learned this week, that it takes a lot longer for a wireless connection to handshake and initialise. When programs start with windows, they are often ready to go before the wireless internet connection. If the connection isn’t present when they are ready to go, they assume there isn’t a connection, will never be a connection, and don’t go looking for one at regular intervals. That is the shortened version of what really happened, with all of the profanity removed:)
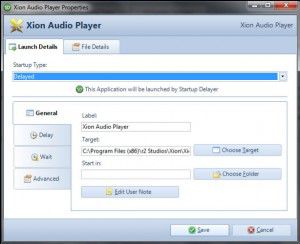
Armed with this new knowledge I turned to Google and searched for “start up delay”. The first result was R2 Studios Startup Delayer. I downloaded it, installed it, told it that I wanted it to start my web server 5 minutes after the machine starts…………AND IT DID! No questions asked! I just love it when this stuff happens, as it just doesn’t usually happen at all these days.
This program has a free and a paid version, both of which do far more than I require in this instance, but I will delve in deeper and do a more concise review in a later post. It was a very easy install. It requires Dot Net 2 (free from Microsoft, and installed automatically if you don’t already have it), and once installed, it is just a matter of telling it what programs and processes you want it to start, and when you want it to start them. It is so easy to use!
Now, you might be thinking “I don’t have webcams” or “My internet connection is wired”, and you think you may not have a use for this program. But what you really need to think about here, is that when windows boots, almost EVERY program you have on your computer is not only using up your CPU starting up, but it is also phoning home to validate, looking for updates, your antivirus and anti spyware is looking for updates, Microsoft/Windows Updates is checking to see whats going on, and dozens of other “services” you don’t even realise are running on your computer are ALL trying to get started, and get on the internet at the same time.
BOTTLENECK!
Have you ever wanted to just turn on your computer and check your email, or Google something real quick and then shut off? Maybe you want to spend 3-5 minutes on your computer to look at something, or find an answer, but your computer takes 3-5 minutes to even become useable because it is Soooo Slooow when it starts up. Maybe you want to be on your computer all day, but you would just like to be able to use it in less 10 HOURS OF TURNING IT ON!!!
Wouldn’t it be good if you could tell ALL of those other offending programs and services to wait a while before they do their business? Maybe even stagger them so instead of them all trying to start up at once, they do it one at a time in an orderly manner?…………Now your getting it!
The free version will do pretty much everything you want, but I will be buying the pro version anyway (only $20) because I believe these people deserve a little something for their efforts, it really is a great piece of software!
Being a web designer, graphic artist, and a photographer, well you could say I use my mac to deal with images quiet a lot. I estimate that in my “Resources” folder on my server (made up of stock photos and graphics) and my own photograph collection, I have around 100,000 images. When I need to find a texture, or a stock photo to suit a specific purpose, I may need to browse through a folder with up to a 1000 images in it. The great thing about having a 30″ monitor is that you can open the folder up, fill the screen and see a lot of the files quickly. My FAVORITE thing in Snow Leopard was the icon size slider. Just by dragging the slider located at the bottom right of every folder view left or right, you could make icons small to fit more on screen for faster browsing, and when you think you found what you need, you could drag it up to enlarge the icon for a closer look. It was GREAT!
One of the first things to piss me of in Lion was that the slider is gone. (Literally, It only took me about 3 mins to notice it missing).
In search of a solution, I found a icon slider in the “View Options”, but this meant each time I need to change icon sizes I had to open another window, and it was a real pain.
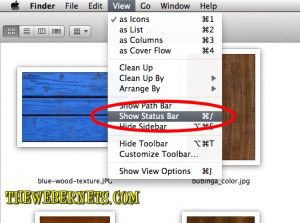
Today, I stumbled upon the solution – The slider is still there in Lion (YAY!), but it is just turned off by default (BOO!). To turn it back on, click any blank area on your desktop to select the finder, then open the View menu, slide down and select/check “Show Status Bar”
It seems a bit ambiguous when you are looking for the icon size slider to have to select “Show Status Bar” to bring it back, but at least it is still there!Another cool feature available in this view menu, is to select/check “Show Path Bar”. Once it is checked, you see a “breadcrumbs” style path to where your file is. Very Handy!
We use cookies on our website to give you the most relevant experience by remembering your preferences and repeat visits. By clicking “Accept”, you consent to the use of ALL the cookies.
This website uses cookies to improve your experience while you navigate through the website. Out of these, the cookies that are categorized as necessary are stored on your browser as they are essential for the working of basic functionalities of the website. We also use third-party cookies that help us analyze and understand how you use this website. These cookies will be stored in your browser only with your consent. You also have the option to opt-out of these cookies. But opting out of some of these cookies may affect your browsing experience.
Necessary cookies are absolutely essential for the website to function properly. This category only includes cookies that ensures basic functionalities and security features of the website. These cookies do not store any personal information.
Any cookies that may not be particularly necessary for the website to function and is used specifically to collect user personal data via analytics, ads, other embedded contents are termed as non-necessary cookies. It is mandatory to procure user consent prior to running these cookies on your website.