Stop Transmission Opening Dialogue Box Window For Each New Torrent Added

Want to Stop Transmission Opening Dialogue Box Window For Each New Torrent Added?

Transmission BT Icon Logo

Transmission is a great piece of software, but in its default settings state it does have some quirks that can be a little annoying. To learn how to stop this you can watch the below video, or continue reading.

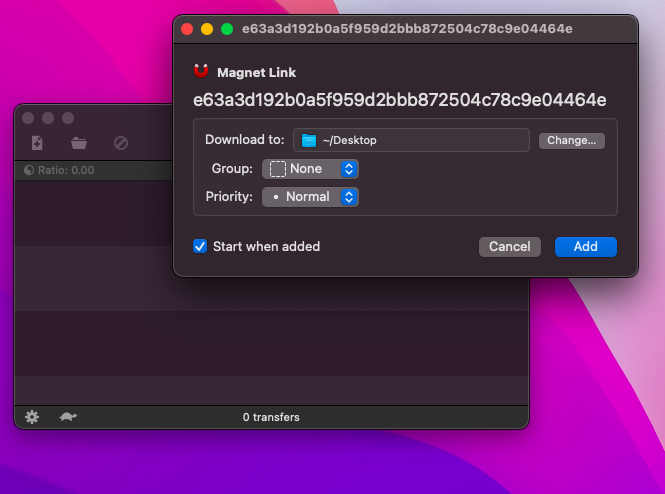
When adding a new torrent, a dialogue box ALWAYS opens, even after you have set your default download locations for both complete and incomplete files.

Transmission BT New Torrent Dialogue Box Window

Wouldn’t it be great if you didn’t get that window, and downloads just added and started automatically without you having to click the “Add” button every time?

Here’s how to stop this annoying behaviour once and for all!

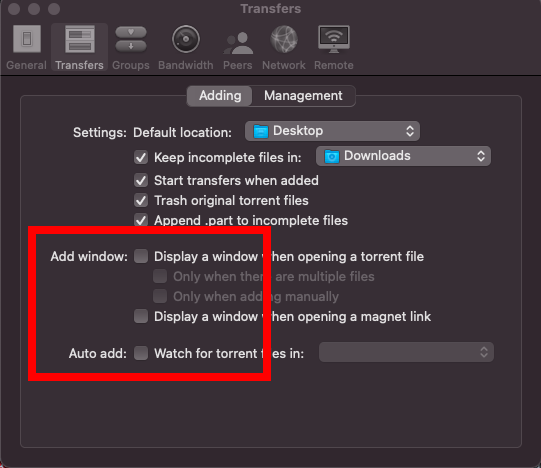
Open Preferences, and click on the “Transfers” tab. Make sure you are looking at “Adding” and not “Management”.

To stop it from opening that annoying window make sure ALL of these options are unchecked.

Transmission window display preferences

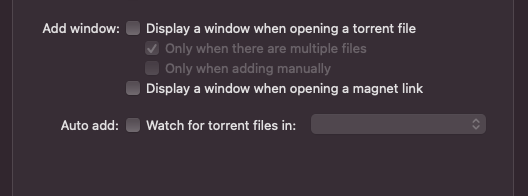
**NOTE** – Be sure that EVERY option is unchecked! I found in my testing that leaving one checked (as shown below), and un-checking the parent option still made the window appear, even though the check was greyed out

Transmission preferences capture

As always, make sure you are using the latest version of Transmission BT which can be downloaded HERE.

How To Find Frame Number In Video Movie File for FREE on Windows Mac and Linux

How To Find A Video Frame Number

From time to time you may find you need to know the frame numbers of individual frames in your videos and movies. This is especially useful if you are compressing and encoding video and want to be able to refer back to your source video and compare it to your encoded video. By picking a specific frame and knowing its number, you can view it from both versions side by side to see how it looks.

I recently stumbled upon DJV, a really useful and FREE program from Darby Johnston that amongst many other things, will allow you to see the frame numbers in videos. It has Windows, Mac and Linux versions, and can be downloaded free from the Darby Johnston Github Page HERE.

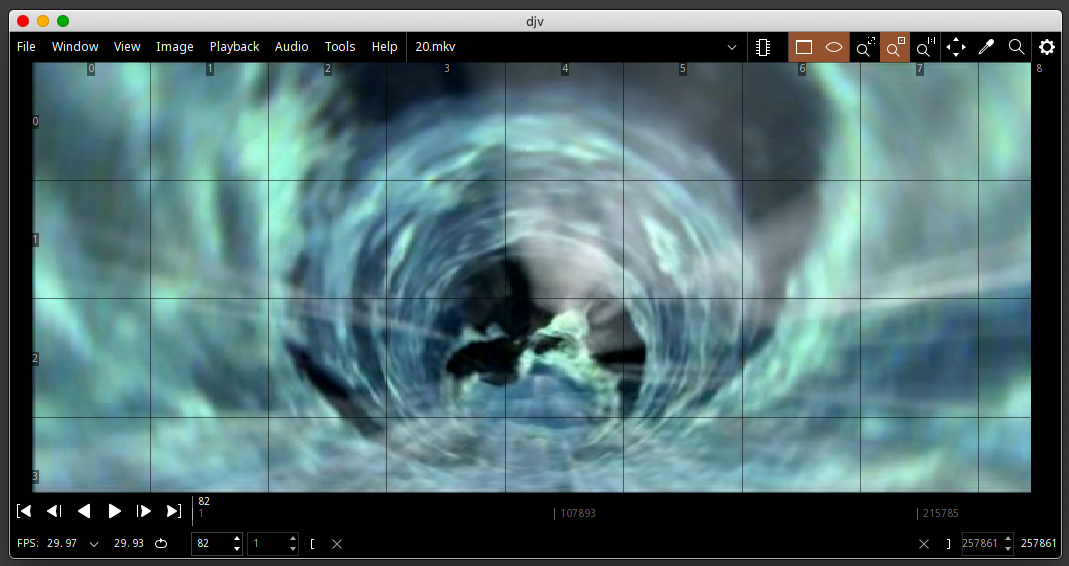
Once you have downloaded and installed DJV open it up, and you will see the main interface. Drag and Drop your video file onto DJV to load it.

DJV Main Interface Window

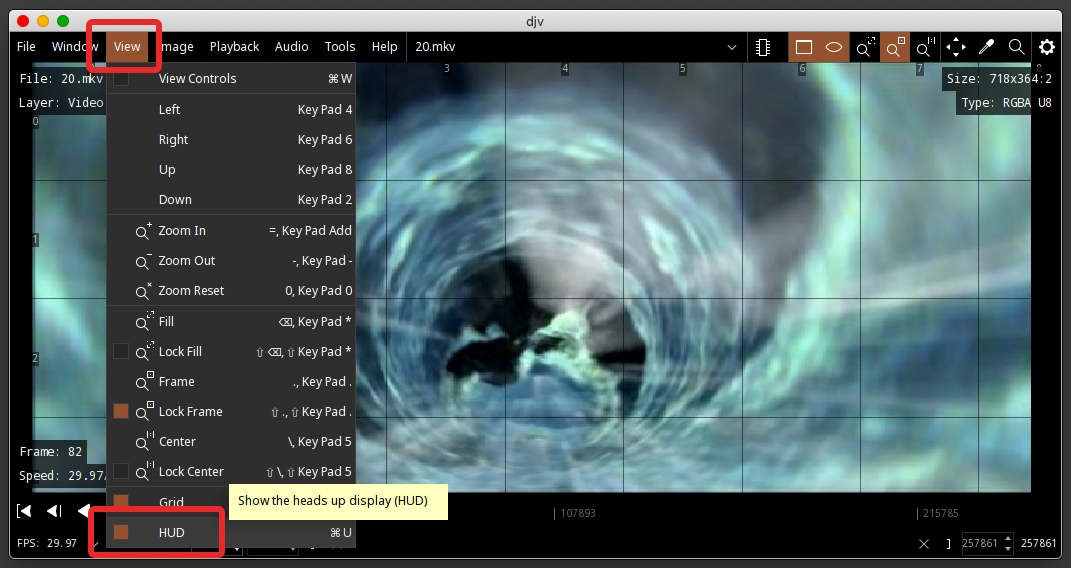
To show the frame numbers we need to click the “View Menu” and select “HUD”, which is short for Heads Up Display.

DJV Show Heads Up Display

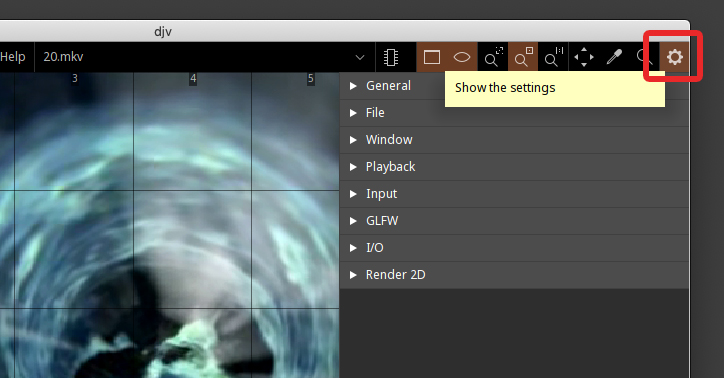
Next, open the settings/preferences from the top right corner.

DJV Settings Selection

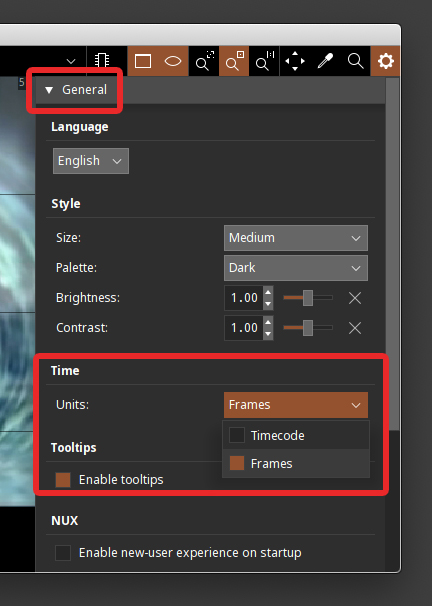
Then click and expand the “General” section, and in the “Time” option set the units to “Frames”

DJV Timecode to Frames

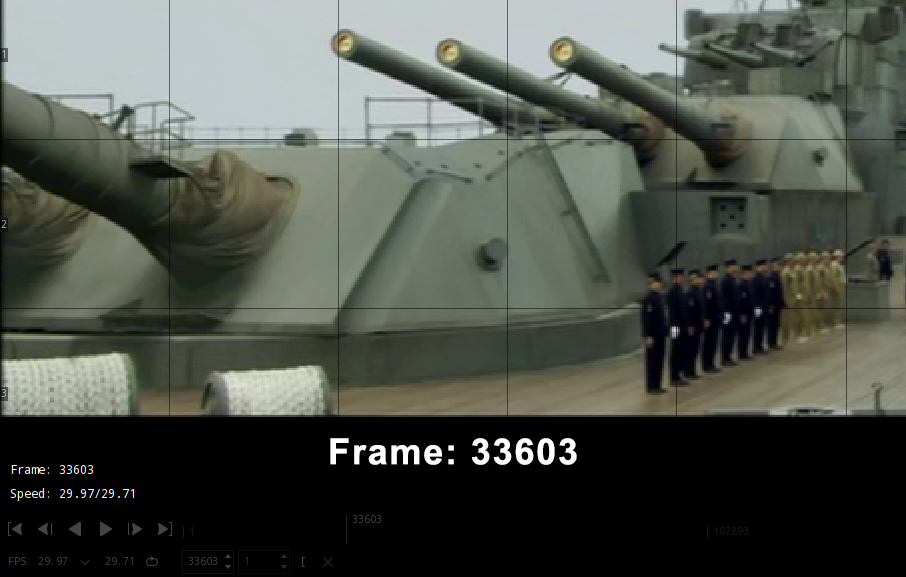
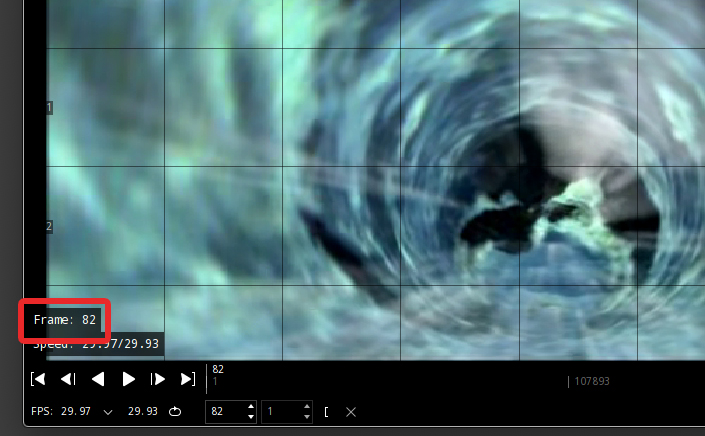
In the bottom left corner you will now see the frame numbers displayed.

DJV Frame Numbers

Best Optimal Settings for Handbrake convert DVD to H265 HEVC Mac Windows Linux 2023

Convert DVD to H265 with HandbrakeConvert DVD to H265

Convert DVD to H265 HEVC with Handbrake without having to know or understand all of the settings. Just copy my settings and you’re done!

H.264 Vs H.265 – Which one should I use?
If you have a 1080 HD TV and an older media player you will want to use H.264 – See THIS ARTICLE for instructions.
If you have a 4K Television and a newer media player H.265 is best, so use these instructions below.

*Whilst your user interface may appear slightly different than shown here (depending on if you are using Windows, Mac or Linux), the settings and results will be the same across all platforms.

**NOTE** – These settings are for DVD to H265 HEVC Video
Use these settings if you have a recent 4K UHD Television and newer media player like the Apple TV 
4K.
To convert DVD to H.264 – CLICK HERE!
To convert 1080P BLURAY to H.264 – CLICK HERE!
To convert 1080P BLURAY to H.265 – CLICK HERE!
To convert 4K BLURAY to H.265 – CLICK HERE!

INSTRUCTIONAL VIDEO COMING SOON!

THE SHORT VERSION

IMPORTANTBefore you begin, drop your source DVD file into Mediainfo and identify if the video stream is 480 or 576 size! (Different countries use different sizes)

1 Open source file in Handbrake and make sure you are on the “Summary” tab
2 Set file format to “MKV’ and deselect “Passthru Common Metadata”
3 Click “Dimensions” tab and set Resolution Limit to 480p or 576p (depending on your source file) and leave Anamorphic as Automatic, leave cropping “Automatic” and borders “None”
4 Click the “Filters” tab
5 Leave Interlace Detection set to Default, De-interlace set to Decomb, and Preset at “Default”
6 Click the “Video” tab
7 Select “H.265 10-Bit (x265)” from the Video Codec drop down
8 Select “Same As Source” in “Framerate”
9 Check the “Constant Framerate” button
10 Set “Encoder Preset” slider to “Slow”
11 Set “Encoder Tune” to “None”
12 Set “Encoder Profile” to “Main 10”
13 Set “Encoder Level” to “4.1”
14 Set the “Constant Quality” slider to “22”
15 In the “Additional Options” box ad strong-intra-smoothing=0:rect=0:aq-mode=1:rd=4:psy-rd=0.75:psy-rdoq=4.0:rdoq-level=1:rskip=2
16 Click the “Audio” tab
17 Select the preferred 5.1 channel soundtrack – If it is AC-3/Dolby Digital 5.1 click pass thru and go to step 20
18 Set “Codec” to “AC3” and the Bitrate to 448kb
19 Set Mixdown to “5.1 Channels” and Samplerate to “48”
20 Click the “Subtitles” tab
21 Click the “X” in the circle at the right side to remove the subtitles track on Windows, or select “None” from dropdown on Mac
22 Click the “Chapters” tab
23 Uncheck the “Create Chapter Markers” option if you don’t want them, or leave it checked if you do
24 Give your output file a unique name and save it somewhere easy to find
25 Make a preset to save the settings and Press the Green “Start Encode” button

THE LONG VERSION

Continue reading “Best Optimal Settings for Handbrake convert DVD to H265 HEVC Mac Windows Linux 2023”

Easiest Best Optimal settings for Handbrake DVD Video Conversion – FEB19

encoders-dilema-graphic

THERE IS AN UPDATED VERSION OF THIS ARTICLE FOR FEBRUARY 2022 USING HANDBRAKE VERSION 1.5.1 HERE

This is a simple easy guide on how to make the best encodes with the smallest file size in Handbrake without having to know or understand all of the settings. Just copy my settings and you’re done!

To get started right away please scroll down to the red text that says “START HERE”.

**NOTE** These settings are for DVD Video ONLY – You can find a updated Blu Ray Tutorial HERE.

MY RANT – By popular demand, I have decided to update my two articles on how to quickly and easily produce great quality DVD and Blu Ray video encodes with Handbrake. The program interface has changed, the H.264 codec has been refined, and the TV’s we view our movies on have evolved dramatically since writing the original articles.

THE GOAL – To produce the highest quality video with the smallest possible file size, whilst retaining the entire original 5.1 Dolby Digital sound track. DVD’s playing on todays large 4K TV’s look terrible due to their low resolution. We will also use Handbrakes filters to clean up the picture quality.

DISCLAIMER – This method will produce very nice quality DVD videos, but may take 2 hours or more to process each hour of video, so my advice is to let run whilst you are sleeping each night. Unfortunately, good quality video with small file size cant be done quickly, it just doesn’t work that way. Also, All set-ups are different. We all have different size TV’s, different size and shape rooms, different players and a plethora of other factors that could produce varying results. This is a guideline, and a great place for a beginner to start. If you feel there is something that could be done better, or should be done differently, please feel free to let us all know by leaving a comment.

THE TECHNICAL STUFF – My TV is a 65″ Samsung 4K which I absolutely love, and sit about 10-12 feet back from. I play the media from a Apple TV 4K, and use the Infuse Pro 5 player app. The video is encoded on a 3-4 year old HP desktop computer with a Intel I5 processor. The version of Handbrake used in this tutorial is v1.2.0 which is the current stable release for February 2019.

Ready to encode? START HERE! 

Continue reading “Easiest Best Optimal settings for Handbrake DVD Video Conversion – FEB19”

Quick and Easy Convert DTS 5.1 or AAC 5.1 to Dolby Digital AC3 on Mac with MKV Tools

MKV Tools can convert AAC and DTS to Dolby Digital!
MKV Tools Logo

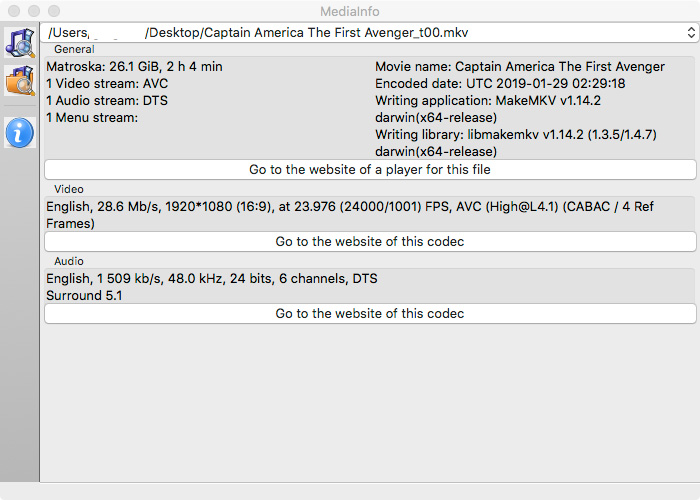
A lot of new TV’s these days do not support the DTS Soundtrack found in BluRay and DVD discs. I learned this the hard way when I got my new 65 Inch Samsung 4K TV. A lot of older audio equipment can not play AAC 5.1 either. I have ripped a lot of my Blu Rays to a network drive and it seems a large number of them have DTS. Usually, us Mac users are left out, but in this case we have an awesome tool available to us to fix this easily called MKV Tools. It works very quickly as it allows the video to “Pass Through” without having to be re-encoded. Only the audio is touched. As you can see in the below screen capture of my source file in Media Info below, the video file I am starting with has a DTS sound track.

DTS Video File

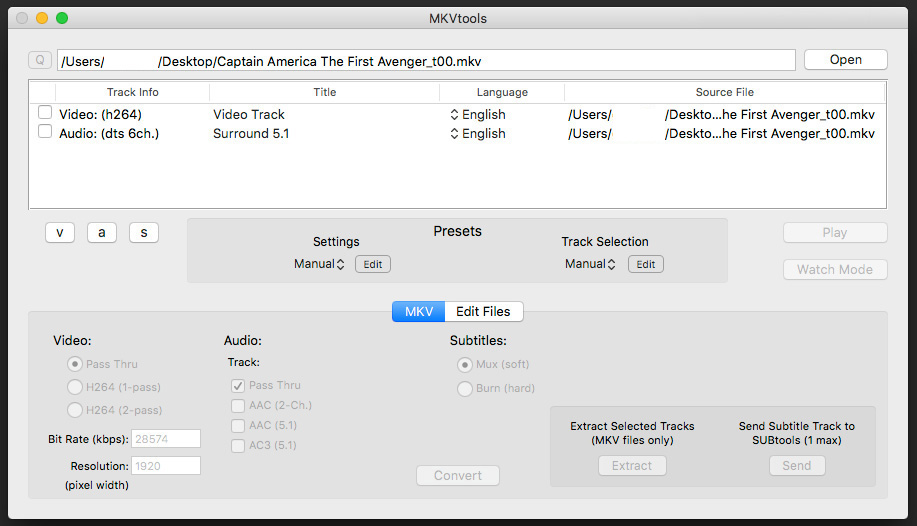
To convert it to a more compatible AC3 format download and install MKV Tools HERE. Once you have opened MKV Tools you will need to choose “Open” to import your video file, as drag’n’drop is not supported in the unregistered version. At this point you will receive another “Nag” window. Just wait a few seconds and you will be able to select “Register Later”, then you can choose your video file. Once the file is imported you will see the main window.


MKV-Tools-Window-1

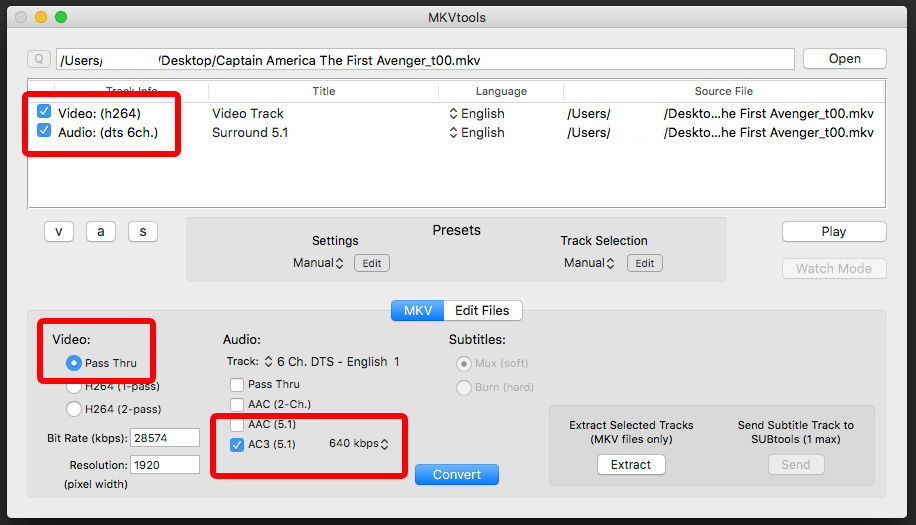
At this point you need to select the video and audio streams you need to work on, then you can start making adjustments.

MKV-Tools-Window-2

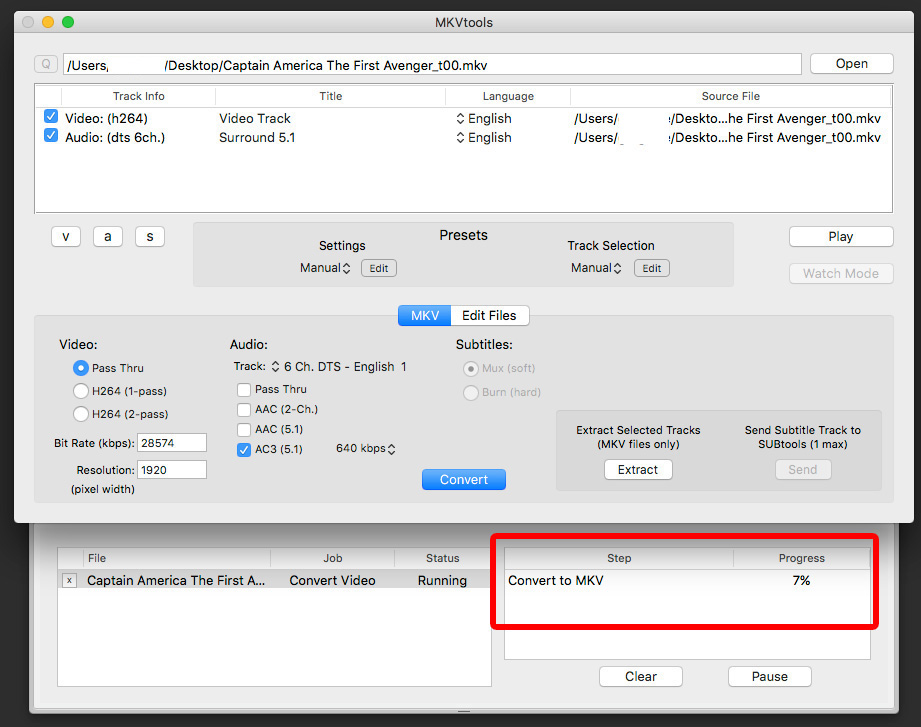
Once you have selected the Audio and Video channels, make sure video is set to “Pass Thru”. In the audio options, select AC3 (5.1) and deselect “Pass Thru”. Then set your desired bit rate. I prefer 640kb, but you can go down to 384kb comfortably without any real noticeable quality loss. Then, press the “Convert” but and MKV Tools will start converting your audio stream. A new tab will fold out underneath the main window where you can view the progress.

MKV-Tools-Window-3


Whilst MKV Tools is not technically free, it is a bargain at $5.99. You can use it without paying to re-encode as many videos as you like, but given how powerful and convenient it is, and how little it costs, its well worth buying/registering in my opinion. I did!

Easiest Best Optimal settings for Handbrake 1080p Blu Ray Video Conversion on Mac, Windows and Linux – UPDATED – MARCH 2023

Convert BluRay to H.264 with Handbrake

Convert BluRay to H.264 2023 Handbrake 1.6.1

Convert BluRay to the smallest file size in Handbrake without having to know or understand all of the settings. Just copy my settings and you’re done!

H.264 Vs H.265 – Which one should I use?
If you have a 4K Television and a newer media player you will want to use H.265 – See THIS ARTICLE for instructions.
If you have a 1080 HD TV and an older media player H.264 is best, so use these instructions below.

*Whilst your user interface may appear slightly different than shown here (depending on if you are using Windows, Mac or Linux), the settings and results will be the same across all platforms.

**NOTE** – These settings are for 1080P BLURAY to H.264 Video ONLY
Use these settings if you have a 1080 HD Television and older media player
To convert 1080P BLURAY to H.265 – CLICK HERE!
To convert DVD to H.265 – CLICK HERE!
To convert DVD to H.264 – CLICK HERE!
To convert 4K BLURAY to H.265 – CLICK HERE!

THE SHORT VERSION

1 Open source file in Handbrake and make sure you are on the “Summary” tab
2 Set file format to “MP4’ and deselect “Passthru Common Metadata”
3 Click “Dimensions” tab and set Resolution Limit to 1080p and leave Anamorphic as Automatic, leave cropping “Automatic” and borders “None”
4 Click the “Filters” tab
5 Leave Interlace Detection set to Default, De-interlace set to Decomb, and Preset at “Default”
6 Click the “Video” tab
7 Select “H.264 (x264)” from the Video Codec drop down
8 Select “Same As Source” in “Framerate”
9 Check the “Constant Framerate” button
10 Set “Encoder Preset” slider to “Very Slow”
11 Set “Encoder Tune” to “Film”
12 Set “Encoder Profile” to “High”
13 Set “Encoder Level” to “4.1” – If this wont play on your system drop it back to “3.1”
14 Set the “Constant Quality” slider to “24”
15 In the “Additional Options” box add ref=5:bframes=5
16 Click the “Audio” tab
17 Select the preferred 7.1 or 5.1 channel soundtrack
18 Set “Codec” to “AC3” and the Bitrate to 448kb
19 Set Mixdown to “5.1 Channels” and Samplerate to “48”
20 Click the “Subtitles” tab
21 Click the “X” in the circle at the right side to remove the subtitles track on Windows, or select “None” from dropdown on Mac
22 Click the “Chapters” tab
23 Uncheck the “Create Chapter Markers” option if you don’t want them or leave it checked if you do
24 Give your output file a unique name and save it somewhere easy to find
25 Make a preset to save the settings and Press the Green “Start Encode” button

THE LONG VERSION

Continue reading “Easiest Best Optimal settings for Handbrake 1080p Blu Ray Video Conversion on Mac, Windows and Linux – UPDATED – MARCH 2023”