Easiest Best Optimal settings for Handbrake 1080p Blu Ray Video Conversion on Mac, Windows and Linux

Handbrake Logo

THERE IS AN UPDATED VERSION OF THIS ARTICLE FOR 2023!
CLICK HERE TO BE REDIRECTED

This is a simple easy guide on how to make the best encodes with the smallest file size in Handbrake without having to know or understand all of the settings. Just copy my settings and you’re done!

**NOTE** – These settings are for Blu Ray Video ONLY – If you want to convert DVD Video see the tutorial HERE.

My Rant – (If your not interested in my rant, scroll down to where it says “Lets Get Started”)

Circa 2000 I got really pissed off at DVD’s. You start watching them, get relaxed and into the story, and when you least expect it they skip or freeze. Sometimes they even crashed completely. In my experience, the damn things were so unwatchable that I swore I would never buy another one again. Blu Ray has been around for a while now, and it started to feel like time to try again with this new technology. I did my research, and found a player that will play all regions (Regional Encoding – one of the stupidist restrictions in the history of technology), and made a somewhat hefty investment in starting a Blu Ray collection. I purchased all of the Marvel Movies, Agents Of Shield, Alcatraz, and I had been hearing a lot about Arrow, so I purchased a Season 1 and Season 2 box set for $80 AUD. I got through Episode 1 and 2 ok, but at episode 3 the old DVD issues appeared. To cut a long story short, EVERY one of the 8 discs in the set crashes about halfway through, and the last 2 episodes on each disc will not play at all. I cant believe the movie studios get away with it. Can you imagine how many bad discs there must be around the world? Again, they drive us to action that they deem illegal.

In order to watch the show I paid $80 for – I was forced to rip the discs to my hard drive. There are plenty of tutorials out there that show you how to do this, so I am not going to cover that here. Once I had ripped the episodes, each file was almost 6GB in file size. I set about trying to reduce the sizes and found thousands of different ideas and methods. It is a topic a lot of people are very passionate about. Factors like TV size, Viewing distance, hardware, drive space restrictions and a plethora of other concerns are all valid. But if you are like me, and just want to reduce your episodes to a more manageable size, whilst retaining most of the quality, here’s how to do it.


Lets Get Started

PLEASE NOTE This method will produce very nice quality 1080p videos, but may take 2 hours or more to process each hour of video, so my advice is to let run whilst you are sleeping each night.

Once you have ripped your Disks to MKV files with Make MKV, Open Handbrake (You can download the latest version for free HERE) then press the source button and select the file you want to convert, or if you want to do a batch of files, select the folder that contains all of your ripped MKV’s. Handbrake will import them all, but you will only see the first one. Now it’s time to make some adjustments to the settings.
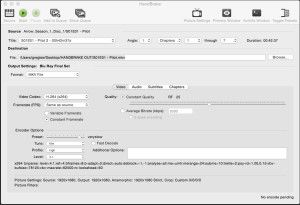
Handbrake SettingsAll of your settings should look like the above screen grab – Click it to enlarge.


THERE IS AN UPDATED VERSION OF THIS ARTICLE FOR 2023!
CLICK HERE TO BE REDIRECTED


1. Set the output format to MKV File

2. Click the button that says “Video”. Make sure the video codec is H.264 (x264)

3. The frame rate should be “Same as Source” and Constant Framerate should be selected.

4. Check Constant Quality and adjust the slider until the RF number goes to 25

5. For the encoder options, slide the preset slider to Very Slow. Trust me, it takes a while, but the quality is far superior, and usually yields a smaller file size. Unfortunately it is a trade off for speed vs quality. Like I said, run it while you are sleeping.

6. Leave “Fast Decode” unchecked.

7. Set Tune to Film

8. Set Profile to High

9. Set Level to 4.1

10. Now click the “Picture Settings” button in the top right side of the window.

Picture Settings ButtonA new window will open. Change all of your settings look like this
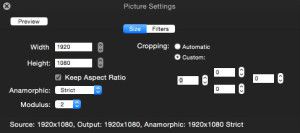
handbrake size11. Whilst in the picture settings window, click “Filters” and change all of your settings to look like these as well
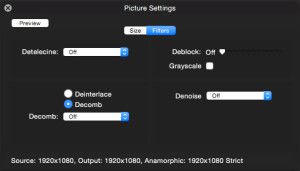
handbrake filters12. Now you can close out the Picture Settings window and select the “Audio” tab in the main window.
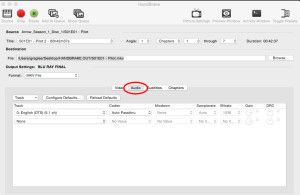
Handbrake Audio SettingsI am a real Audiofile, I love the Dolby Digital and DTS 5-7 channel audio tracks in movies, so I select “Auto PassThru”. But, if regular 2 channel Stereo is ok for you, you can configure that in this area if you want. I figure you are converting a Blu Ray, so you might as well have the best sound quality as well. Just select the Dolby Digital or DTS sound track from the drop down window, and choose “Auto Passthru”

13. Click the “Subtitles” tab and select none

14. Click the “Chapters” tab and make sure “Create Chapter Markers” is un-checked.

15. You are now ready to start encoding. If you are only doing one file, just press the “Start” button and Handbrake will start encoding. If you are doing a batch of files, open the File Menu and select “Add All Titles To Queue”
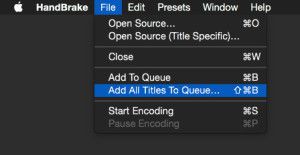
Add All Titles To Queue16. Press the “Show Queue” button to see all your files waiting to be encoded
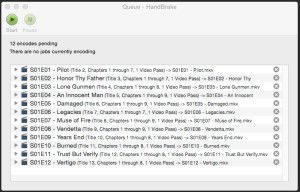
Handbrake Queue17. Press the “Start” button and your encoding session will begin.

Using this method I have been able to shrink each of the episodes from about 6GB in size down to about 1.3 to 1.5GB in size, retaining the full 1080p resolution and DTS sound track. The picture quality is very nice on my 42 Inch Samsung LCD TV. I play the files off my WD TV Live Hub and connect using HDMI cables. If you have a larger TV and notice some artifacts or “Blocks” in the picture, tweak the RF number slightly to 24 or at most 23. Adjustment here affects file size and quality considerably, so tread carefully and use small increments.

THERE IS AN UPDATED VERSION OF THIS ARTICLE FOR 2023!
CLICK HERE TO BE REDIRECTED


Quickly and Easily Batch Rename your TV shows and Movie Files with Filebot on Mac, Windows and Linux

Filebot LogoThe quickest and easiest way I have found to keep my video library under control is by using an automatic file naming tool called Filebot. You can view the website HERE.

From the creators website:

FileBot makes organizing your movies and TV shows a breeze! We’ll automatically match your files with information from various online databases. How you want your media files to be named and organized is completely up to you. Our groovy format engine supports pretty much anything!

Filebot UI

What I like best about it is being able to customize the output in anyway you please. I arrange my files in folders, so I have no need for the show title to be in the filename, I just like the season and episode number, as well as the episode title. But you can make your filenames include pretty much anything you want by adjusting the output formula.

Heres My Filebot Formula
{s00e00} - {t.replacePart(' Part $1').replaceAll("&", replacement = "And").replaceAll("'", replacement = "").replaceAll("!", replacement = "").replaceAll(",", replacement = "")}

Also from the Filebot website, here are some sample naming options:

Filebot Naming Formula

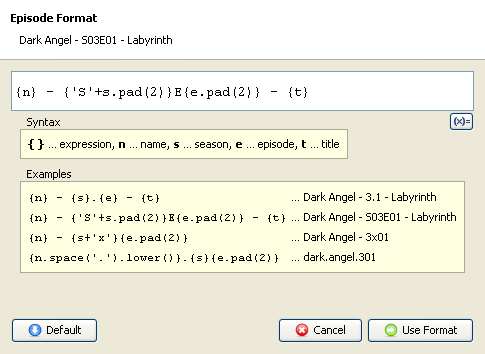
{n} - {s00e00} - {t}Dark Angel – S03E01 – Labyrinth

V:/TV Shows/{n}/Season {s}/{sxe} - {t}V:\TV Shows\Dark Angel\Season 3\3×01 – Labyrinth

{n.space('.').lower()}.{s}{e.pad(2)}dark.angel.301

{n} ({y}){" CD$pi"}The Man from Earth (2007) CD1

{n} [{y}] {vf} {af}The Man from Earth [2007] 720p 6ch

Filebot is free to download and use from their website HERE. MAC USERS – If you try to download Filebot through the app store it is not free – It costs $4.99US, but you can get the latest version for free from Filebots Sourceforge file repository HERE. Just open the folder for the latest version and download the app.tar.gz version of the file.

Another way to recover data from a dead hard drive

Hard Drive Icon

There are plenty of articles on the internet that provide you with many ways you can attempt to reclaim data from a dead or dying hard drive. Everything from putting the platters in a new drive casing to bagging the drive up and placing it in the freezer for 20 minutes. These all seem to be fairly extreme measures to me, so here’s a quick tip I have discovered recently by accident which may help.

I have a number of old drives I have been using as storage, and I recently needed to access a file on one, and when I plugged the drive into my USB dock it spun up but would not mount. I re-tried several times and it refused to load. Needless to say I was pretty unhappy. I kept coming back to it over the next few days, trying again and again, hoping it would mount so I could “just get that one file”. A few weeks later, whilst having a clean up, I decided to give it one more try and if it didn’t work, I was going to throw it away.

I plugged the drive in, it spun up, and again it refused to mount. At this point I was called away quiet urgently, and I left with the drive plugged in and turn on. After about 4-5 hrs I returned, and found the drive had some heat in it. Wondering if this might yield a result I switched off the drive, then switched it on again, and it mounted, and I was able to get the file!

 Woohoo

I seized the opportunity to copy off all the other data on the drive, and then I started to wonder…

I had two other drives that I had deemed dead in the past, so I plugged those in and left them to warm for a few hours. After restarting them, both of them mounted as well. One mounted and appeared to work well, but the other mounted just long enough for me to drag a few files off, and then it ejected itself again. In the week or so since, I have been able to reconnect and use two of the three drives normally.

I’m wondering if tarnish might have built up on the read/write head over the period when it was not in use, and a little bit of heat might have been all it took to break it down enough for it to be able to read again? Either way, if your drive spins up but wont initialize, this method might be well worth trying before you take extreme action.

Fix Connectivity Problems by Power Cycling your Home Network and Computers

Unplugged

Power Cycling sounds like riding a bike really fast up a hill, but in the technology field it refers to a way to get everything back online when things aren’t working right, or you have to recover from a failure or freeze.

A Power Cycle is achieved by turning everything off safely, disconnecting the power sources, and leaving everything to sit for a in-determined amount of time (some say 30 seconds, some say 30 minutes).

I find Power Cycling makes all my devices talk to each other quicker. As I have a somewhat sophisticated home network, yanking the cord on everything from time to time allows new routing tables to be created, and old machines that are no longer connected to the network (That may have been a Master Browser (Machine that tells other machines where everything is located)) to be removed from the environment.

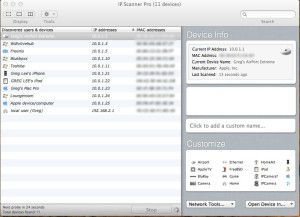
We’ll use my network as an example to go through the procedure, as things do need to be done in a specific order. Using a IP Scanner (There’s lots of free ones available – just Google IP Scanner) I generated this view of my home network.

IP-Scanner

To begin a Power Cycle, I turn all off the Computers and my Server off. Once they are safely and completely shut down I yank the power cords from the sockets (This is important, if it is still plugged in, there is still power going in, keeping things in memory – So YANK IT!). With my Laptops, I take the batteries out. Next, I shut down and unplug my WD TV media machines and the “Elements” hard drives attached to them. My iPhone and iPad are now shut down by Pressing and holding the Sleep/Wake button (Power Button on top right side of device) for a few seconds until the red “slide to power off” slider appears, and then slide the slider. Lastly, My Airport Extreme Router, D-Link Switch, and ADSL Modem are all disconnected from the outlets.

Now I go throw a tennis ball with my Dog Benson for about 10 minutes. This allows plenty of time for any power left in the devices to drain away, and all caches and memory to clear.

Benson

After playtime I get ready to restart everything. First, I plug the modem back in and let it initialize and connect to the internet. Then I turn on my Switch, and my Airport Extreme Router is next. When they are all operational and happy, I turn my computers on one at a time, beginning with the one I use most, first (So it can become the Master Browser). Once it is up and connected to the internet, I turn the next one in my usage order on, and let it connect, then the next, etc, etc. Then, I boot up my WD TV Live Hub and reconnect the “Elements” storage drives, and lastly, I power on my iPhone and iPad by holding down the Sleep/Wake (Power Button on top right side) for a few seconds until I see the silver Apple logo appear.

Everything should be back up, running, and happy!

Some people will tell you there is no advantage to power cycling. I personally, do believe it helps, and if you are undecided, Try it for Yourself and make up your own mind! What have you got to loose?


Compare and Syncronize your Files and Folders on Mac, Windows and Linux for FREE with FreeFileSync

Free File Sync LogoBoy have I got a GEM for you! I’ve just stumbled upon Free File Sync – a FREE file and folder sync program. It does everything that the programs you have to pay for do, and more, FOR FREE!

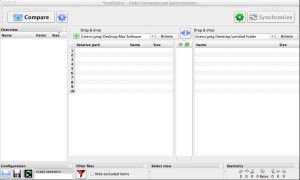
Free File Sync Main Window

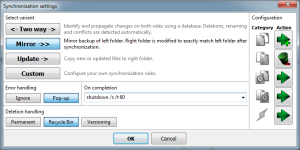
Free File Sync is available for Windows, Mac, and Linux. It can Mirror Sync (Left To Right) as well as Sync in Both Directions (Two Way), Can Compare before Sync, has lots of sync options such as Archiving/Versioning duplicates, Moving to trash and permanent deletion, and you can even make it shut down your machine once syncing is complete.

Free File Sync Setting

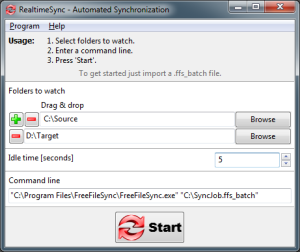
It will even do Live Real time syncing. Just select the folders you want it to watch and as soon as you add a file to that folder, Free File Sync will automatically sync the file to the your destination folder – How Cool Is That!

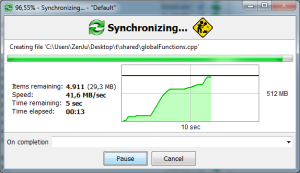
Real Time SyncWhen synchronization is occurring, you get a nice informative window telling what is going on.

Free File Sync Progress WindowI am really blown away by this program. I have just deleted my copy of Chronosync (Which I payed $40 for) as well as my copy of Martian Slingshot (Real Time Sync which I payed $30 for) and now have Free File Sync on all my machines – FOR FREE!

Download your copy of Free File Sync HERE.

And don’t forget to donate a few bucks via Paypal if you can! This program is well worth it!

Easily add Meta Tags to your music with Musicbrainz Picard

musicbrainz-picardThere’s nothing I hate more than dropping new music into my iTunes library only to learn once it has finished importing that it doesn’t have meta-tags (No Song Name, Artist, Album Title etc etc). So now, before I add new music, I run it through MusicBrainz Picard. Here’s the programs description from their site:

“MusicBrainz Picard is a cross-platform (Linux/Mac OS X/Windows) application written in Python and is the official MusicBrainz tagger.

Picard supports the majority of audio file formats, is capable of using audio fingerprints (PUIDs, AcoustIDs), performing CD lookups and disc ID submissions, and it has excellent Unicode support. Additionally, there are several plugins available that extend Picard’s features.

When tagging files, Picard uses an album-oriented approach. This approach allows it to utilize the MusicBrainz data as effectively as possible and correctly tag your music. For more information, see the illustrated quick start guide to tagging.

Picard is named after Captain Jean-Luc Picard from the TV series Star Trek: The Next Generation.”

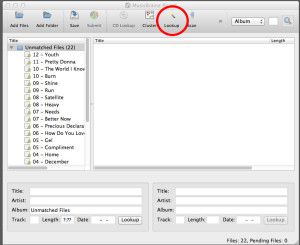
To get started, download and install MusicBrainz Picard HERE. Once you are up and running, drop the music files you want to tag anywhere in the window. They will then populate the list on the left called unmatched files.

mb1

When you have finished adding files, click the line of text with the folder icon next to it that says “Unmatched Files” to make it active. When it is active it will become highlighted. Now, go ahead and press the “Lookup” button, and MusicBrainz Picard will start scanning your music and comparing it to their database for identification.

mb2

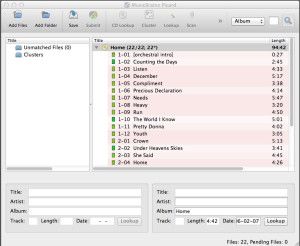
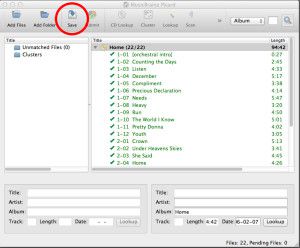
Once MusicBrainz Picard has identified the album and added all of the songs to it, the CD icon next to the album name will turn gold in color. If you don’t have all of the songs from the album, it doesn’t matter, you can still proceed, but the CD icon stays silver. The next step is to click Album Name next to the CD icon to make it active, and highlighted. You can now click “Save”.

mb3

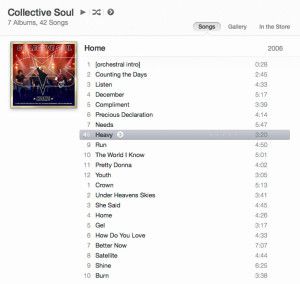
MusicBrainz Picard will now write the Meta Tag Data directly into your music files. Once it has completed, you can close out of the program, and then drop your music files into iTunes, and everything will be correctly categorised and ready to play.

mb4