 Over time I have sent a lot of email from my iPhone, and it seems like iOS4/5 remembers every one of them fondly. As soon as I start typing an address it offers me a list of all of those email addresses that I sent one email to 3 years ago, instead of the one I want, and use regularly. In this post I am going to show you how I cleared that list on my phone.
As you would expect, you need to download a third party app and hack into the bowls of your phone to do this. And if you do decide to do this, you do so at your own risk ok!
I found a program called iBackUpBot, which lets you modify a number of aspects of your iOS4/5 device. Its not a free program, but there is enough functionality in the trial version so you can clear your recent emails list though. There is a Windows and a Mac version, so the procedure will work on both systems. Download and install.
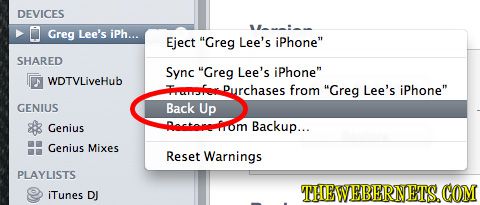
Once you have downloaded, plug your phone in, and open iTunes. The first thing you need to do is make a back up, because its the back up files you will be working on. To force a back up, Right click on your device in the iTunes side bar and select “Back Up” from the context menu.
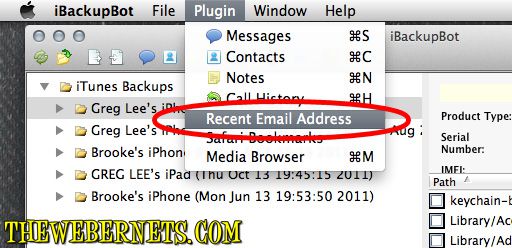
Once the back up is complete, you can close out of iTunes, but leave your phone connected. Now open up iBackUpBot. You will need to select the back up file you just created (by device name, date and time) and click it. It will then start analyzing your back up file. Once it has finished analyzing you will see a whole bunch of entries appear on the right. Dont worry about these, as we wont be using them for this procedure. The next step is to select “Plug In” from the menu, and then select “Recent Email Addresses”.
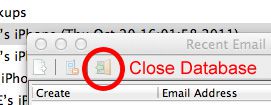
You will be confronted with a window that prompts you to purchase the program, you can click the cancel button to make it go away. Once it disappears, a window called “Recent Email Address Viewer” will pop up and you will see the list of recent email addresses stored in your phones memory. You can now go through the list and delete the ones you don’t want to see any more, and keep the ones you do. Just click on the offending address then hit your delete key. Once your finished, click the “Close Database” icon to save your changes and close out the window.
Now it’s time to reload your modified file back to your phone. Click the “Restore Backup To iPhone” button to begin. You will have to click OK/Accept in a dialogue box, and it will take a little while, so be patient.
Once everything is finished, you can close iBackUpBot, disconnect your phone and try it out!
Ahhhh…….No More irrelevant email addresses……….


This is a very informative article. It would really help me a lot on managing my iPhone. I really appreciate this article.
Everything worked well until The “Resotre Backup to iPhone” failed. Does the program require purchase to make this step functional?
No, i never purchased it, and i had no problems restoring from the back up.
THANKSSSS!!!!!!!! THIS WORKED FLAWLESS! THANK YOU SOOO MUCH !
Amazing !!! You are a genius!!
Thanks!
This worked perfectly for me!
many thanks,
I did the fix on Mac OSX 10.8.2, iOS 6(iPhone 4S), iBackupBot v3.6.2 (unregistered)
I ran into 2 problems:
1. I needed to make sure my iTunes backup was unencrypted.
2. I lost all my Mobile data settings on my iPhone – but that was a very easy fix.
thanks again.
Does anyone know why that when I attempt this exactly per instructions, and I click on “plugins”, “recent email addresses” is NOT selectable??
I tried closing iTunes & iBackupbot and trying again several times with same result. Any help much appreciated! Thanks!